FINDING THE BEAUTY IN DECAY, CORROSION, AND THINGS PAST THEIR PRIME

Every once in a while we chance upon art that leaves us awestruck. A jaw-dropping calendar of photographs I received in 2015 had imprinted on me the beauty that can be found in this world - and the equally staggering destruction of our climate.

The calendar was created by Louis Helbig, based on aerial photographs from his book Beautiful Destruction, of the Alberta oil/tar sands, and the messages he conveys through his medium and the guest excerpts by several well-known personalities.

This calendar still hangs in my studio, 7 years later, so struck was I by his work: the patterns captured from the air, the expressive perspectives, the barrenness of the landscapes. My hope was that one day I too could capture such beauty in my art, developing my own artistic eye to see these unusual lines, forms, movement and patterns.

While my focus may not be about climate change (although it is a meaningful and important topic), I have begun in the last few years to capture the lines we find around us, both natural and manmade, and often altered or corroded by the elements. My Lineations series has been all about these lines. 

Tree Rings

I like to photograph these elements close-up, capturing snippets and affected areas that have rusted, corroded, decayed, weathered. The Japanese philosophy, Wabi-sabi is all about the beauty of things imperfect, impermanent, and incomplete, and plays a part in my art these days. This concept has given me a unique perspective as I look at the world around me. I now see with new eyes the beauty in rust, a flower past its prime, peeling paint, crumbling stone, the wrinkles in aging hands.

During a hike on a local trail last month, we happened upon a number of abandoned and rusted items - farm equipment, cars, a stove, fridge, tools - seemingly left behind on what used to be a farm in the 1950s. I likened these discards to outdoor art - and took many photos -  suggestive of ideas for my own future fibre art.


A few years ago I embroidered a series on hands - the aging hands of four women over the age of 80 - along with a small biography on each of the very creative women I picked. I'm still fascinated with hands, as there is so much history, wisdom, and experience in their lines and scars. I called this series "Hands of Time".


To represent the timeworn lines of my subject, I like to use the sew 'n slash technique of layering fabrics, then cutting and distressing with agitation and heat, as well as adding embellishments, all revealing the characteristics and secrets hidden below the surface. 

HEEDING MY OWN ADVICE

Okay, I admit it. My plan to do a daily textile practice with a specific piece of fibre art has fallen off the rails. I missed the goals posts on this one. Maybe it was doomed from the beginning because, after all, I didn't follow my own advice when making the plan. That advice being that, if I'm unsure of the next step on a piece, I should let it sit for a few days until the answer comes. That is exactly what my plan didn't include. And what I didn't follow at first.

But these last couple of weeks I did let it sit. I did turn turn to other works to create, and happily got drawn into those instead. So it's not like I wasn't doing something daily.

And then that lightbulb moment did arrive, which got me back on track with this piece, and gave me the next step.

Quite simply, I realized it wasn't a piece to hang against the wall - it needed some shaping, forming, some kind of structure - to add some dimension. To change the conversation.

And so it is now a piece in the round. The hanging bits, which I didn't think worked earlier, now work. I also added more dark fabric around the top and bottom edges, adding contrast next to the lighter areas and hanging bits to help them pop somewhat. .

I really do like how it's hanging now. Is it done? I need to leave it for a few days to decide.

Related Posts:

6 ways to determine if your artwork is finished

Why Silence is Powerful in Art


WHY SILENCE IS POWERFUL IN ART

It's easy to fall into the trap of making art that is too busy. To add too many elements to our designs. When we do that, we dilute what is important, we lose sight of the message we are trying to convey. The focal point can get lost. And our art becomes less memorable. It's the quiet - or silent - areas of our art that gives power to what should be in the spotlight. 

We need to choose - and remember during the creation process - what we wish to take centre stage. To remove the elements that don't belong. We may be in love with a detail we have added and be reluctant to discard it. But if it doesn't add to our message, it needs to go. It needn't to be lost forever, it could simply become the focus of another piece, an idea to explore separately. 

Like in music, our art needs both quiet parts where we can take a breath, and energetic areas that are in the limelight. The silent, subdued areas of our art allow the eye to rest, acting like an interlude, leading to the more intense and emotional sections our eyes are drawn to, just like the climax in a musical score. This is the power of silence in art.

My latest additions to my daily textile art piece have led to busy-ness. There is now too much going on and not enough restful spots. My eye doesn't know where to look. I had very much wanted to add ties pieces at the bottom, hanging down below the art, but it now needs tweaking.

That back & forth process of adding, layering, masking, removing elements is a necessary part of the creative process. And remembering to add quiet bits. Just like the music composer, parts are written, erased, changed, altered again, arranged, and so on until we find the right fit for our message. We seek balance, harmony, and movement, giving structure to our compositions, setting the stage for our audience.

It means not rushing, as that will result in frustration and pieces we are not happy with. Taking our time is what is needed, stepping back, letting it unfold. Letting the process roll out, not focusing on the end results. It's a dance of creation that we are experiencing. Enjoy the dance. Enjoy the rhythm. Allow the quiet spaces to emerge, giving power to where the energy needs to live.

In my last post I mentioned I felt there was a bit of a "map" theme going on in this art piece. I haven't pursued this just yet - it may still be an element that comes through. I may need to add more areas that do look like water, which will add some of the much needed silent spaces. So maybe the map will still come through.

Related Posts:

Art Destruction, De-construction, Re-making

Adding Contrast, My Daily Textile Challenge

Art Challenges Online - Do they Work for You?


ART DESTRUCTION, DECONSTRUCTION, RE-MAKING

I can't imagine making a piece of art, then destroying it. I have deconstructed a few pieces on occasion, salvaging most, if not all, the parts to be used in future. But the only time I recall destroying art was when I really did not like it and felt it could not be fixed or improved upon.

Art destruction is a thing. Some art is made to be temporary - a sand castle, an ice sculpture, cake decoration, the sand mandalas created by Tibetan monks. This latter example especially serves to help us understand that the process of creating is what is important, not the end result. 

But re-making a piece of art I can relate to. This I have done. When something is not quite right, or when we realize it can be improved upon, re-making - or combining with other pieces - doesn't feel destructive. It feels like the right step to new beginnings.  

At a mixed media class a few years back, we played with collage materials and paint and other delicious ways to make marks on paper. We didn't focus on making finished art, rather the class was about trying out these techniques, playing and seeing what exciting things we could come up with. Our pieces became wonderful backgrounds for future, as-yet-unknown art. I still have the wonderful backgrounds we made, although to this day have not used any of them. They have been awaiting a purpose ever since.

As mentioned in my last blog post, I am now incorporating one of these collaged papers into the fabric piece I am making as part of a daily textile practice. Pictured here is the background I chose, with the fabric portion laying on top.

Admittedly, I didn't do any stitching, sewing, adding or cutting of fabrics for a few days even though my goal was to something daily. Rather, I contemplated how I wanted the fabric and paper collage to work together. The idea that materialized was to cut both so they could be woven together. After living with this viewpoint for a few days, it was feeling right. I was not going to rush - having learned my lesson many times that it's better to wait a few days and feel confident about a decision than to rush and regret it. 

The first cut was the hardest. My head asked if I was doing the right thing, There was no looking back after all. My intuition however kept saying this was right. And that is what I had to follow. There was no other answer that seemed correct.

Once the first cut is out of the way, it gets much easier. I cut slits in the paper collage, then began cutting the fabric piece into strips to weave into the paper. With a few decision about parts to not cut (these areas would become features), the weaving is part way done. 

I'm pleased with how this is looking so far. Following my intuition was exactly right, not rushing to find the answer. Looking at this photo of the work, I'm reminded a bit of a map. Maybe that's a hint at what my next step should be?


Related Posts:

Adding some contrast - my daily textile challenge

Art challenges online: Do they work for you?


ADDING SOME CONTRAST - MY DAILY TEXTILE CHALLENGE

This is an update to my post earlier this week on my textile art challenge. I've been doing a little bit most days, and this piece as part of my new Daily Textile Practice has taken an interesting turn.

I've sewn on a few bits and cut through the layers of some fabrics to get some movement in the piece. I also added a fabric with a pattern I wasn't fabric, but one which I did a bit of eco-printing on - the colours seemed to be a good fit.


Sometimes a piece seems to take a lot of work and many layers before we feel it coming to life, before it turns into a dynamic art piece that reflects the message that we want to convey. This is a very normal part of the creative process, yet one that many people can get hung up on. As one art teacher has so rightly pointed out years ago "art has to go through an ugly stage before it becomes beautiful". It's taken years of art-making for me to learn patience with the progress and building of layers.

For this particular textile piece, I was expecting some construction as well as de-construction, that I would be taking two steps forward and one step back, aa and that at times I would feel some frustration at progress. 

But stepping back to allow the next steps to come to us is important.

A quote from an interview with Paul McCartney that I read recently can really help:

"...What I normally do is just leave it and let it marinate. Then [I] either go back to it and think, "Oh, you know what, that bit of the lyric is OK but I need to fix it," or write a complete new set of lyrics. But I think everyone gets the block from time to time."

Can you relate to this? And this isn't just a name of someone we don't know, but a real artist we are all familiar with.

As I worked on my piece, I was feeling that while the colours were harmonious, I was a long way from creating a dynamic look. 

Then, while tidying my studio, I came across 2 painted/mixed media papers done in a class a few years back, mostly paper, with some stitching, but never finished.  I had kept them in case one day, you know, I would find the use for them.

One I thought was the right fit - shown here with the houses - I have loved making art of buildings over the years, and this one to me added a bit of sense of home. And yet it wasn't as harmonious as I first thought it would be. The colours were a bit off, as was the scale, throwing the whole look somewhat off balance


So I tried the second art paper, more of an abstract - which at first I was reluctant to use - I feel it fits so much better. The colours are harmonious. It adds some contrast, which adds interest and has potential to make some areas pop. 

Do you agree with my choice? Here are the photos of the abstract one. I've included black & white photos too which are better at showing off the darks and lights. 


ART CHALLENGES ONLINE: DO THEY WORK FOR YOU?

I'm not very good at following through on these online art challenges. Whether based on works we've already made or that we make during the challenge, and whether they are 30 days,100 or more, I start yet rarely seem to make it through the specified number of days. I think because the challenge themes don't always quite fit with my own direction, like when having to follow a map, but sensing I'm going in the wrong direction. Other times I simply run out of art to post that fits with the theme.

On the flip side, these challenges can be a great way to be involved in an art community, practice techniques, initiate a new creative habit, spark some inspiration, perhaps even set new goals. They may traverse topics such as repurposed materials, textiles, painting, sketching, photography, collage, animals, and sometimes are your own artsy choice. Whatever your interest, there is probably an art challenge out there.

I've completed only 2 truly successful challenges to date, both of my own mapping:

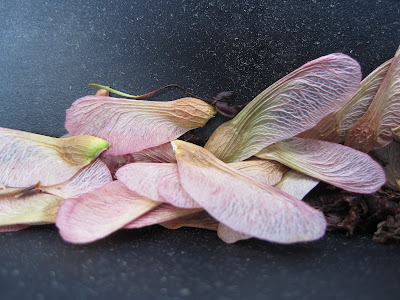
One in 2016, with 30 days of taking photos and writing haiku based on each photo. I don't recall if I did this every day or over a period of weeks, but I did end up with 30 days' worth once I was done. It got me into the habit of taking photographs regularly, a practice I still enjoy today when out in nature. And I've used several of the photos from this challenge, and photos I've taken since, as references to create some of my fibre art pieces. 


"You can't see the wind
But you can see its effects
Maple seeds galore"

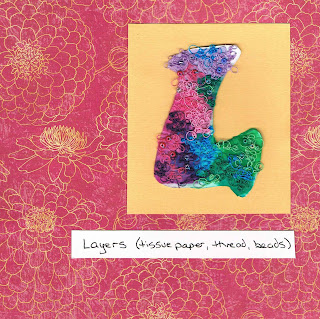
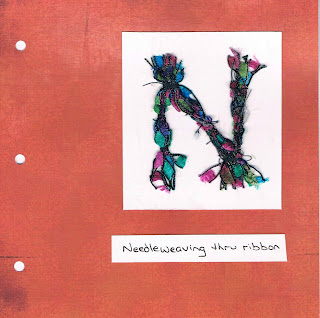
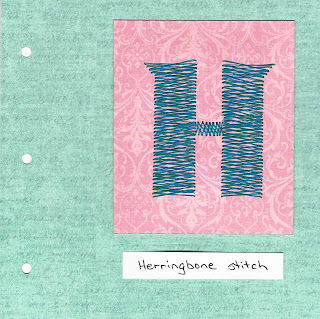
The other challenge, in 2014, was an Alphabet Book, made in accordion style, with each letter of the alphabet on a different page and using a different  technique, provided it began with the same letter. The best part was the chance to practice techniques, for example, for the letter H I learned the Herringbone embroidery stitch, L was about practicing Layering, and N was experimenting with Needleweaving. 


Posting 2 letters every week, and in order of the alphabet, I actually zinged right through from A to Z. It was a project that was creative in many ways, and because I could visualize the final result and see the paths I needed to follow, I quickly got to my final destination. It also helped that friends and followers posted their comments and looked forward to seeing the next set of letters materialize. And I was delighted when, a few months later, I was invited to speak to a local women's group about this project.

I've decided it's time to once again take on a daily challenge. Hopefully I will stick to this goal for a significant part of 2022. Here is my plan:

  • By the end of the challenge I envision having a large textile wall hanging, larger than I have ever made in the past
  • I will work on it (hopefully) every day but for sure each week. If not everyday I will need to make good progress each week, while at the same time not feeling overburdened. 
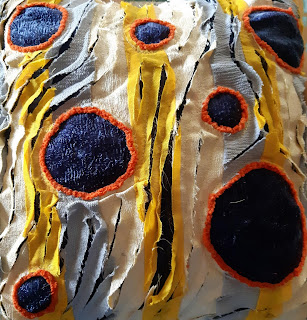
  • One day may be just pinning on a piece of fabric to audition it, another day may be stitching down fabric, layering or maybe cutting pieces, adding embellishments, or even just sorting through a fabric bin for more to include. As long as there is progress. It could be just 2 minutes a day, or 5, or 30, doing a bit each day, as I do have other projects on the go.
  • I see this project as a Slow Stitch approach - a few minutes each day when I can slow down and be mindful. 
  • Posting my progress weekly either through this blog or on Instagram - and with a photo - may help keep me on track.
  • A key ingredient is to use only fabrics that are meaningful to me in some way - pieces of lace gifted from a friend - bits of an old quilt made by someone in my family (the quilt has been falling apart so I may as well use up the fabric pieces) - part of an old curtain -  linens gifted by another friend - an old blanket - material I had gelli painted but never used - fabrics from a trip to India - perhaps even embellishments such as old buttons or brooches.
  • I have no sense of what the final piece will look like. I will follow wherever the path leads, deciding at the time which fork to take, backtracking when needed. The joy will be in the journey on this one. 

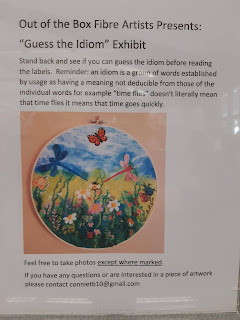
I hope to include this artwork in a group show being planned for the summer. And am aiming for 100 to 180 days of work on this. And it doesn't need to end with the show, it could continue afterwards if it becomes part of my daily creative routine. 

Having pondered this idea for a few months, I had made a start earlier in the fall, but wasn't quite ready then to continue on a daily basis. But now it feels like the right project at this point in my creative journey.

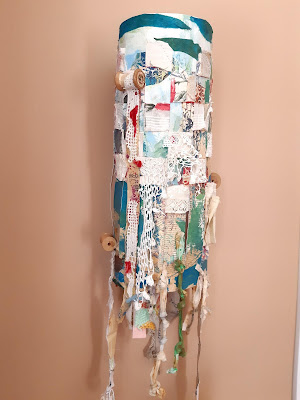
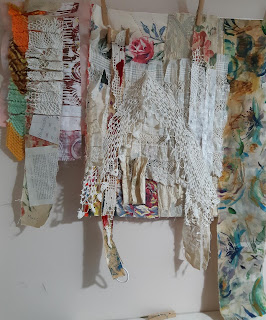
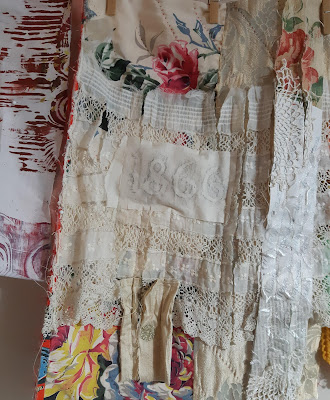
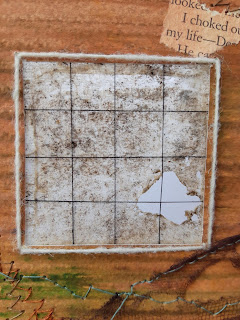
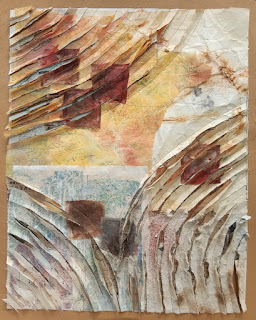
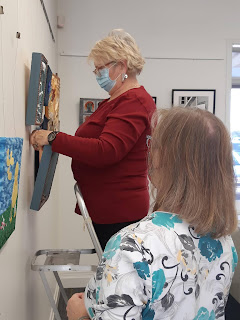
In preparation, this week I cleared and hung the what I had already completed on a wall in my studio where I can see it every day, just like a design wall. Previously the piece was hung over the back of a chair - mostly out of sight, therefore out of mind. 

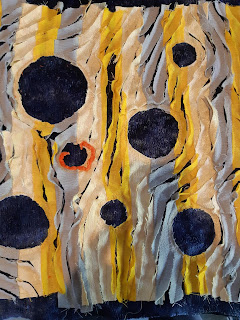
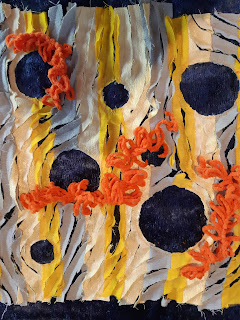
So far the colours I've been drawn to are soft and harmonious, a direction to follow and see where it takes me.

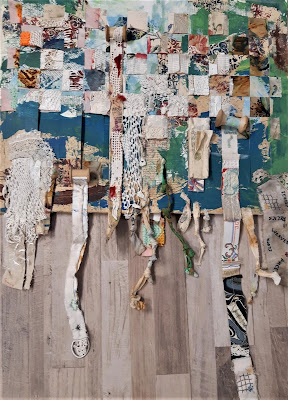
Here's a picture of they layers I had started. And now I hope to do just a bit more each day - and by letting you know, and posting updates regularly, I hope that will keep me on track.


THE UBIQUITOUS TEABAG - AND SOME ARE SUSTAINABLE TOO

I'm a tea drinker. And I love including used teabags in my fibre art. The versatility of the teabags - and the tea - is second to none. The colour is appealing and I like that I'm repurposing these little bags in which we steep our tea. What I didn't know until recently is that many teabags contain a bit of plastic, meaning they should not be composted after use. Some brands however are made from 100% fibrous plant material, including my preferred brand of Red Rose.

About 4 years ago, knowing I was saving teabags for my art after my tea had steeped, my husband came to me asking if I wanted the teabags that had gone through the compost. Many were not breaking down and others just a bit (perhaps due to the inclusion of plastics at that time?), and he had put several aside as he was spreading compost in the garden. 

YES, I responded. Teabags that have been in the compost heap are enticing: rich - organic - saturated with colour. I could not have brewed such expressive tones through other means. My husband had no idea what I would use them for but seemed to instinctively know I might want them. Fast-forward 4 years, and he still rescues them from the compost for me. The teabags I use today have no plastic in them so we check on and collect them earlier from the composter than we used to, plus I now know I'm not adding any plastics to the pile. 

"Some people will tell you there is a great deal of poetry and fine sentiment in a chest of tea.” – Ralph Waldo Emerson 

These versatile teabags can be altered in so many ways:

  • add hints of ink, natural inks, alcohol inks, watercolours
  • sewn by hand or machine 
  • cut, folded, gathered, tucked
  • bound like a book
  • woven
  • embellished with beading, writing, embroidery, tiny paintings
  • heat distressed
  • composted for a richer colour
  • and the tea grounds are also useful for creating an aged look on paper and fabric, and when eco-printing. The grounds are, thankfully, compostable. 

Teabags can make an appetizing element in a design and strengthen a composition. Here are some ways I've infused them in my fibre art:

I first used these compost coloured teabags as the windows in a three dimensional vacant factory building I constructed from cardboard and on which I painted, stitched, and added a bit of collage. The teabags perfectly represented the grimy windows on these old, neglected buildings. And when I began heat distressing some parts of the walls with a heat gun, and accidently made a hole in one of the "windows", I realized it looked just like a broken pane of glass. A couple more "accidents" completed the look I was seeking.


I've found teabags work great when interpreting tree bark in fibre art. Several of these teabags have been lightly sprayed with alcohol inks to add variation and richness, then machine sewn into place.


In this piece titled Peeling Paint, I sandwiched teabags between the gray and pink layers, adding a subtle hint of brown only revealed after burning back bits of the pink fabric with a heat gun.


My goal for this piece, Paper Trails, was to create a focal point and movement to draw the eye around by 1) juxtaposing the straight edges of the tea bags against the soft curves of the papers, and 2) creating contrast by spraying some alcohol inks on the teabags to add a deeper hue against the background colours.

Preparing used teabags for use:

I use mostly Red Rose brand teabags which do break down in the compost heap. Brands that have plastic in them should not be put through the composter. Depending where you live they can either be sent to commercial composters, thrown out or, better yet, incorporated into your art. 

  • If composting, collect the teabags from the compost before they have broken down. 
  • After steeping or removing from the composter, allow the teabags to air dry. 
  • Slit or cut close to one edge and remove the tea grounds. Tea grounds of course are compostable, or can be reused in other art projects or when eco-dyeing. 
  • Iron the now empty teabag between 2 layers of parchment.
  • Store in an airtight container until ready to use.


"Each cup of tea represents an imaginary voyage.” – Catherine Douzel
Do you include used teabags in your art? I'd love to see pictures of your work. 


IT TAKES A VILLAGE....

According to thefreedictionary.com, the meaning of "it takes a village"  is 

"Many people's help or involvement is needed to achieve some goal". 

While helping set up an Out of the Box Fibre Artists exhibit earlier this week titled "Guess the Idiom", I was reminded how each time a group of volunteers comes to set up a show, we just seem to just step into the various role without discussion, without assignment, offering our strengths, willing to try a new task, to get the job done and make the best display possible of the art that has been entered into the show.

It doesn't seem to matter if it's a group who has worked together before or if we have new volunteers. We just rally together towards a common goal.

We listen to each other, ask for input, see what each other thinks about a particular arrangement, if one piece looks best next to this one or that one, is one hung too high or too low, are some hung too close together, is the order of pictures conducive to showing each at its best. 

Each time we set up a display, we seem to add a new skill to our skill set. We get new ideas on where to place a tag, a new angle when taking photos, something to add to our toolbox. It just happens. We come together to find the best ways, sharing our knowledge and experience, each contributing our own unique vision, perspective, strengths. 

No one person did more - or less - work than any other. It was a team effort.

We enjoyed seeing the pictures in this exhibit "Guess the Idiom". It was a fun theme, leaving us feeling good, lots of smiles (even with masks on we could see the eyes smiling), appreciating the work and creativity we were witness to. 

As we undertook a final task of finding the best angle to photograph a piece  in a glass cabinet, an alternative perspective was suggested. In awe once again at how well we had pulled together as a team, I shared with the team that the idiom that had come to my mind about our synergy was "It Takes a Village"".😀 There was agreement all around. 

Here are a couple of pictures of some of our amazing volunteer team and a photo of one of the exhibit sections. The show is on through November 29th at the Stittsville Public Library in Ottawa.


DESIGN PRINCIPLES HELP GET YOUR COMPOSITION RIGHT

Who hasn't run into challenges at times when creating art. Too much detail, too busy, lacking a focal point, flat and lacking depth are just some of the roadblocks we may encounter. Others are colours that don't work well together, lack of cohesiveness, parts that don't connect. Can you relate to this?

At times I will backtrack and rip out stitching or paint over parts I feel I've bungled. We all have art that goes through an ugly stage before it becomes pleasing, re-working areas, not always sure if fixative steps will actually fix what wasn't working. 

It takes a lot of practice to improve and know what to alter and what will work, how to create harmony, rhythm that is pleasing, repetition without tedium. Understanding the fundamentals of design can help. 

At a recent online playdate hosted by the Out of the Box Fibre Artists, we learned all about using stripes to create a design. More specifically, the focus was on the power of rhythm & patterns of stripes. None of us had realized just how much there was to learn about the history of stripes or that there is a whole book dedicated to this very topic. 

Our first task was to choose our fabric colours - 2 or 3 side by side on the colour wheel, plus the complementary colours (or neutrals). I choose 2 yellows (a soft yellow and a bright yellow), a bluish grey and a deep blue. Okay, so yellow and blue are not complementary, but I liked how these colours worked together as I auditioned them. 

Next, we cut, laid out and sewed our stripes together in our chosen colours to create a 16x16 square. Then the fun part: creating patterns and movement with the stripes by cutting, rearranging, deconstructing or whatever our hearts desired. I chose to cut out areas to make circles, then sew curves diagonally around the circles to create movement, using the sew 'n slash technique of cutting between the sewn lines from one edge to another.  

Alas, it was clear that my piece was dull, even with the circles and movement. Not what I had envisioned.   

After trying on other colours to enliven the piece, I stumbled on some orange fun yarn in my stash - the perfect complementary colour to contrast with the strong blue and also next door to the yellow on that side of the colour wheel, just like the instructions had suggested.

I had to decide where to place the orange, but that was not intuitive to me. We were of course creating under pressure as it was part of a playdate and we were presenting our progress in just a short time. Creating on demand I find a challenge at times. So random placement was what I decided to do, just to get the colour in there. But it didn't help. It was still flat, only now with pops of colour unconnected to the overall design. 

After the playdate, when I'd lived with the piece for a few days, it occurred to me the orange would make a good outline for the blue circles. This juxtaposition of complementary colours was the answer. 

And the lightbulb continued to glow: balance was also lacking. I decided to trim parts of the yellows and grays to emphasize the dark blue, creating balance and more consistency in the widths of the stripes, and also to balance against the prominent blue of the circles. This resulted in a cleaner look, simpler and less cluttered.

Looking back at the changes I made, the design principles involved in this composition are:

  • Pattern
  • Movement 
  • Contrast 
  • Harmony 
  • Balance
Ta-da! Overall I'm pleased with how this turned out and decided to turn it into a cushion. It now has a place of honour in my little reading chair. 

One final observation: It dawned on me that several of us had challenges with the design side. This playdate was not about learning the design principles, but rather was about having fun playing with pattern - stripes specifically - as the basis for a design. We did not know in advance the steps we would be taking, nor the outcome, so there was no pre-planning, no opportunity to form a vision of what the finished piece would look like at the end of the day. 

Improv playdates such as this are wonderful for opening us up to new ideas, self reflection, and learning far more than we thought. Thanks to an insightful Out of the Box member for coming up with this idea so we could explore and experiment and see where this would take us. 

Link:

Related Post:


ASSEMBLAGE & FOUND OBJECT ART - PERFECT FOR REPURPOSING MATERIALS

Assemblage art is defined by the Tate Art Museum as "art that is made by assembling disparate elements – often everyday objects – scavenged by the artist or bought specially."

Found art, according to the Tate - "A found object is a natural or man-made object, or fragment of an object, that is found (or sometimes bought) by an artist and kept because of some intrinsic interest the artist sees in it."

There are all kinds of examples of these art forms dating back for many years. Pablo Picasso for example was a creator of assembly art. What I like about these art styles is the  scavenging for objects, often keeping them out of landfill when they no longer serve a purpose or have broken down, or repurposing them when coming across intriguing finds at a flea market or secondhand shop into something we can create.

As a fibre artist, I like to include non-textile items in my art pieces when it is appropriate to do so. After cleaning out my mother's old photo albums, for example, I repurposed the photos I didn't keep into painted backgrounds for stitching to make cards. Old cedar planks have become the backgrounds for other art. I've upcycled an old floor grate into a picture frame, and featured a backplate of a door knob in another artwork, surrounding it with more traditional fibre materials.

Old photograph with acrylic paint added, then stitched

The icicles picture at the far left includes cedar planks in the background. The picture on the stand is framed with an old floor grate, and has a doorknob backplate in the middle as it's anchor to build around.

October 19th is Textile Tuesday – one of 5 themed days of Waste Reduction Week in Canada.

Lots of information is available online about the amount of textile waste that goes into landfill, the carbon impact of creating fabrics, how often we keep and wear clothing pieces, the role of plastics in textiles, and so on. And while lots of clothing is donated to thrift shops, not all textiles can be re-sold, some making their way to becoming rags but much more going into landfill. Information on these and more is on the Waste Reduction Week website at Textiles Tuesday | Waste Reduction Week in Canada (wrwcanada.com).

As a fibre artist, I’m tickled pink when we share leftover fabric and other various goods and when I'm offered used items. Sometimes this includes materials we may not have  experimented with or incorporated into our art previously, leading to some wonderful play and new ideas. 

What can we do to reduce textile - and other - waste?

Swap – As the saying goes, one person’s trash is another person’s treasure. I was recently gifted 3 pairs of jeans that were torn and no longer worn by their owners, which I’ve since started cutting up for a couple of projects. There is something appealing about deconstructing old clothing to use for a new purpose.

A group in my neighbourhood has held 2 clothing swaps of men’s, women’s and children’s clothing as well as bags and accessories. All clothing must be clean and in good condition. Clothing is free for the taking, with leftovers donated to Dress For Success.

I’m sure we’ve all donated clothing to thrift shops or church bazaars. There are a few places that will take old towels or bedding – animal shelters for example – but check with them first before dropping off your items.

Mend or Refashion or Repurpose

I spent the first lockdown last year learning to mend – repairing several shirts that had small holes and a jean jacket with worn elbows and cuffs – some with stitching, others by adding patches for a more artistic flair. I’m delighted with how they turned out and how this simple repair has extended the life of these pieces. 

A favourite was repurposing an old burlap bag into a backing for hanging jewellery in a picture frame (see post on this project).

And, as mentioned above, I've used bits & pieces of non-fibre and non-textile materials in my fibre art. 

Play and Experiment

Old fabrics are wonderful to experiment with: eco-printing, painting, fabric collage, re-purposing into patches, making fabric twine, rusting with old tools, practicing free motion stitching. And figuring out what non-fibre objects could be added, or using fibre techniques with alternative materials. 

My experimenting today was a piece of assemblage art I started this week: colourful maple leaves, paints and natural inks, and using printmaking techniques to add a subtle background of leaves to a cedar plank. 

When was the last time you tried making art from repurposed materials and objects?


MAKING ART BY SEWING PAPER, AND BOOKBINDING MADE EASY

As fibre artists, we tend to work with fabrics, occasionally adding alternative materials to our creations. But the past couple of weeks I've been drawn to working with paper. Paper is fibre too, after all, and accepted in the fibre arts world. 

The papers I selected for my first project - all soft in colour - were each meaningful in their own way: old sheet music, pages torn from an old book, tissue paper I had embossed then gelli printed, gampi paper previously embellished but never used, a vintage looking paper bag, eco & rust printed white paper bag, and used tea bags (yes, I'm a tea drinker, not coffee) to which I added some alcohol ink. After tearing and laying out the papers until I had a pleasing arrangement, I tacked down the papers with a gluestick onto Kraft-Tex fabric paper which I had just recently discovered and purchased. 

Using my usual sew 'n slash technique, I machine stitched through all the layers of paper, using a "jeans" needle 100/16, cut between the sewn lines, then folded back some of the papers to reveal the layers below.

This was a great way to use up a bit of my paper stash, hoping to one day find a use for them. We can sew any papers - flyers, newsprint, magazine pages, paper bags, food bags, cardboard, anything that could end up in the paper recycling bin - and even if the papers have been previously painted.

I'm delighted with how this piece turned out - it has wonderful movement, a quiet area, soft serene colours, and strong contrast between the dark, square tea bags and the light, curvy background

My 2nd project was bookmaking, which I learned several years ago. I love the feel of handmade books, and  I think each has a purpose which will one day be revealed to its owner. They can be public or private, bearing silent witness to your thoughts, ideas, sketches, or what have you.  I've sold several soft cover, single signature books over the years, each with a uniquely decorated cover - and often used for sketching or journaling or when traveling, and can be tucked easily into a bag. 

But I had never mastered binding multiple signatures into one book. They always end up wobbly and floppy, and no amount of practice or viewing of videos has helped me overcome this challenge. Until now.

A recently purchased a copy of fibre artist Sandra Meech's book "Connecting Design to Stitch" (Sandra also has a background in graphic design and art) included instructions for making a bound sketch book. Her binding method is the simplest I've seen, and with a slight modification, I tried it. It was perfect. 

For the book cover, I used 2 small canvas art boards (4x6) which I had painted, collaged with leftover papers - torn tssue paper, sewing patterns, and other emphemera -  cheesecloth for texture, and more paint until I had lots of layers and was happy with the look. Yes, there were stages where I thought the boards were ugly, but the key was to just keep playing and layering. 

Each signature is individually handstitched. To bind the signatures together, Sandra outlined a simple weaving method. A photo is below - not great work for me just yet nor have I tidied up the thread ends -  but with a bit of practice I will have this mastered. I used gel medium to glue the first page and very last page of the bound book to the canvases.

I'm happy with this new-to-me technique and I know now there will be more hard-cover handmade books in my future. 


WHAT DOES BEING CREATIVE MEAN TO YOU?

Many people tell me they don't have a creative bone in their body.  That they can't draw a straight line. Which leads me to the ques...