Showing posts with label collage. Show all posts

ART DESTRUCTION, DECONSTRUCTION, RE-MAKING

I can't imagine making a piece of art, then destroying it. I have deconstructed a few pieces on occasion, salvaging most, if not all, the parts to be used in future. But the only time I recall destroying art was when I really did not like it and felt it could not be fixed or improved upon.

Art destruction is a thing. Some art is made to be temporary - a sand castle, an ice sculpture, cake decoration, the sand mandalas created by Tibetan monks. This latter example especially serves to help us understand that the process of creating is what is important, not the end result. 

But re-making a piece of art I can relate to. This I have done. When something is not quite right, or when we realize it can be improved upon, re-making - or combining with other pieces - doesn't feel destructive. It feels like the right step to new beginnings.  

At a mixed media class a few years back, we played with collage materials and paint and other delicious ways to make marks on paper. We didn't focus on making finished art, rather the class was about trying out these techniques, playing and seeing what exciting things we could come up with. Our pieces became wonderful backgrounds for future, as-yet-unknown art. I still have the wonderful backgrounds we made, although to this day have not used any of them. They have been awaiting a purpose ever since.

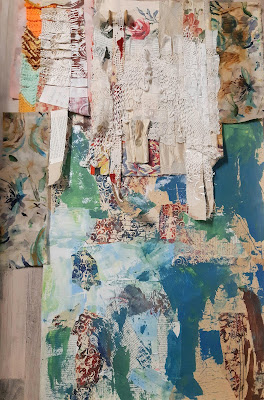
As mentioned in my last blog post, I am now incorporating one of these collaged papers into the fabric piece I am making as part of a daily textile practice. Pictured here is the background I chose, with the fabric portion laying on top.
Admittedly, I didn't do any stitching, sewing, adding or cutting of fabrics for a few days even though my goal was to something daily. Rather, I contemplated how I wanted the fabric and paper collage to work together. The idea that materialized was to cut both so they could be woven together. After living with this viewpoint for a few days, it was feeling right. I was not going to rush - having learned my lesson many times that it's better to wait a few days and feel confident about a decision than to rush and regret it. 

The first cut was the hardest. My head asked if I was doing the right thing, There was no looking back after all. My intuition however kept saying this was right. And that is what I had to follow. There was no other answer that seemed correct.

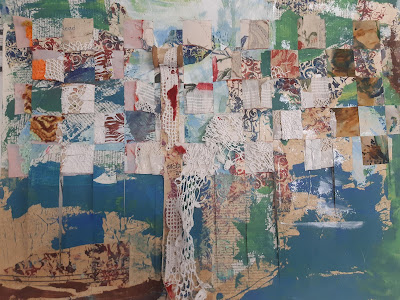
Once the first cut is out of the way, it gets much easier. I cut slits in the paper collage, then began cutting the fabric piece into strips to weave into the paper. With a few decision about parts to not cut (these areas would become features), the weaving is part way done. 

I'm pleased with how this is looking so far. Following my intuition was exactly right, not rushing to find the answer. Looking at this photo of the work, I'm reminded a bit of a map. Maybe that's a hint at what my next step should be?

Related Posts:

Adding some contrast - my daily textile challenge

Art challenges online: Do they work for you?


SAVE PAPER THIS HOLIDAY SEASON: IDEAS TO MAKE YOUR OWN GIFT TAGS AND WRAP

I was shocked when I learned how much paper we go through each year for gift giving at Christmas. Some gets recycled, but much of the Christmas wrap has foil that can't be recycled. Think about how much paper your household may use this holiday season, multiply that by the number of homes on your street, add in your neighbourhood, the city, the entire country. Hard to fathom isn't it. The experts say we send the equivalent of 100,000 elephants to landfill each year in gift bags, paper and ribbons. 

This year I thought I would try to reduce the amount of gift wrap & tags we'll use in our household. We have several of those reusable gift bags. And after being given some pretty Christmas fabric, I sewed up a few gift bags which I've added to what we already had. Other wrapping ideas include decorated or painted kraft paper, newspaper, maps, tea towels, scarves, bags made from old clothes. 

My sister cuts up old Christmas cards into unique gift tags. This year I gathered up torn Christmassy tissue paper, colourful scrap papers, old book paper and sheet music, and turned these into collaged gift tags. 

If you'd like to make your own collaged gift tags, I've included the instructions below. 


 You will need:
  • a variety of pretty tissue papers and scrap papers in various colours. I chose mostly reds, but also some purples and blues and yellows to add interest. Tissue paper is great as it is transparent once adhered to the collage. 
  • heavy paper or cardstock, or art paper (paper that can handle water-based media is best)
  • gel medium (I use Liquitex matte medium) and brush
  • cutting board and knife, or a gift tag punch, or a package of pre-cut plain shipping tags, hole puch
  • iron
  • parchment paper
Instructions:
  1. Select a heavy background paper that can take a few layers of collage. Begin to lay out scraps of the papers and tissue, overlapping and placing them at random. Tear them, don't cut, to add interest. Don't spend a lot of thinking time on this as the papers will be cut out later into the gift tags.
  2. Adhere each paper down with gel medium, adding gel to the right side of the paper as well. 
  3. When dry, cut the pieces into gift tags in the size you wish, or with a tag-maker punch. I have this great punch I purchased years ago from Creative Memories which also punches a hole in the top to add ribbon or cording.
  4. At this stage I like to add a coat of gel medium on the surface to ensure all the papers are sealed. Let dry.
  5. For each collaged tag, cut out or punch one plain tag - this will get glued to the back of the collaged tag, providing an area for writing and adding strength, especially if you find your tags are curling.  
  6. Add a coat of gel medium on the back of the collaged tags. Let dry. Make a small pencil mark on one side of the plain tags, add a coat of gel medium to the marked side, and let dry.
  7. Carefully match up the back of a collaged tag with the marked side of a plain tag. Keeping the edges aligned, place between 2 sheets of parchment paper and iron on high heat for several seconds on both sides. The heat on the gel medium will fuse the 2 tags together into one solid tag, and eliminating any curling that may have occurred with lighter weight papers. Let the tag cool before handling.
Have fun with this - and I'd love to hear your ideas for reducing paper and making your own gift tags and wraps.


TYVEK EXPERIMENTS FOR 2026

Although I'm not a quilter, I am a fibre artist and do a lot of machine sewing, mostly random, improvised lines and some free motion. My...