THE UBIQUITOUS TEABAG - AND SOME ARE SUSTAINABLE TOO

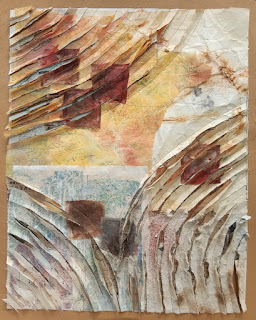
I'm a tea drinker. And I love including used teabags in my fibre art. The versatility of the teabags - and the tea - is second to none. The colour is appealing and I like that I'm repurposing these little bags in which we steep our tea. What I didn't know until recently is that many teabags contain a bit of plastic, meaning they should not be composted after use. Some brands however are made from 100% fibrous plant material, including my preferred brand of Red Rose.

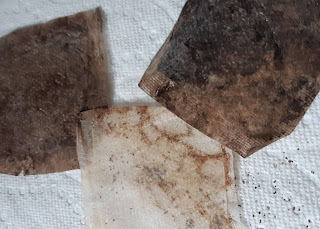
About 4 years ago, knowing I was saving teabags for my art after my tea had steeped, my husband came to me asking if I wanted the teabags that had gone through the compost. Many were not breaking down and others just a bit (perhaps due to the inclusion of plastics at that time?), and he had put several aside as he was spreading compost in the garden. 

YES, I responded. Teabags that have been in the compost heap are enticing: rich - organic - saturated with colour. I could not have brewed such expressive tones through other means. My husband had no idea what I would use them for but seemed to instinctively know I might want them. Fast-forward 4 years, and he still rescues them from the compost for me. The teabags I use today have no plastic in them so we check on and collect them earlier from the composter than we used to, plus I now know I'm not adding any plastics to the pile. 

"Some people will tell you there is a great deal of poetry and fine sentiment in a chest of tea.” – Ralph Waldo Emerson 

These versatile teabags can be altered in so many ways:

  • add hints of ink, natural inks, alcohol inks, watercolours
  • sewn by hand or machine 
  • cut, folded, gathered, tucked
  • bound like a book
  • woven
  • embellished with beading, writing, embroidery, tiny paintings
  • heat distressed
  • composted for a richer colour
  • and the tea grounds are also useful for creating an aged look on paper and fabric, and when eco-printing. The grounds are, thankfully, compostable. 

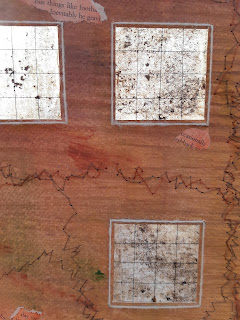
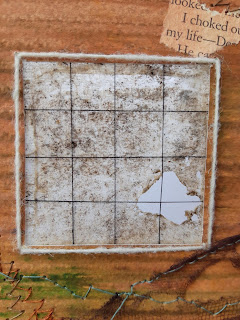
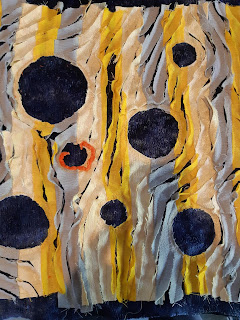
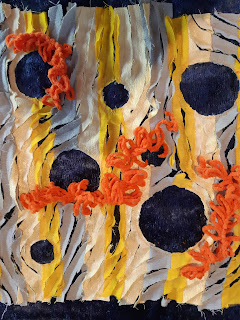
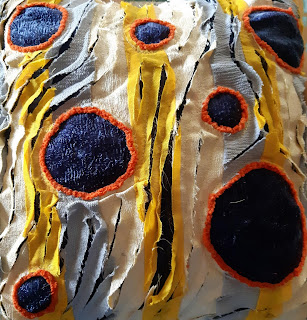
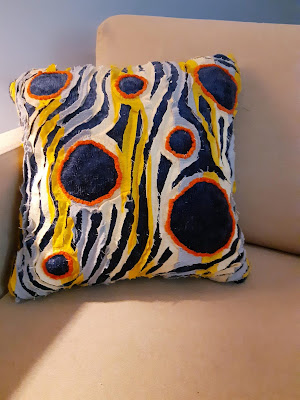
Teabags can make an appetizing element in a design and strengthen a composition. Here are some ways I've infused them in my fibre art:

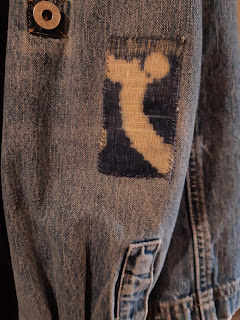
I first used these compost coloured teabags as the windows in a three dimensional vacant factory building I constructed from cardboard and on which I painted, stitched, and added a bit of collage. The teabags perfectly represented the grimy windows on these old, neglected buildings. And when I began heat distressing some parts of the walls with a heat gun, and accidently made a hole in one of the "windows", I realized it looked just like a broken pane of glass. A couple more "accidents" completed the look I was seeking.


I've found teabags work great when interpreting tree bark in fibre art. Several of these teabags have been lightly sprayed with alcohol inks to add variation and richness, then machine sewn into place.


In this piece titled Peeling Paint, I sandwiched teabags between the gray and pink layers, adding a subtle hint of brown only revealed after burning back bits of the pink fabric with a heat gun.


My goal for this piece, Paper Trails, was to create a focal point and movement to draw the eye around by 1) juxtaposing the straight edges of the tea bags against the soft curves of the papers, and 2) creating contrast by spraying some alcohol inks on the teabags to add a deeper hue against the background colours.

Preparing used teabags for use:

I use mostly Red Rose brand teabags which do break down in the compost heap. Brands that have plastic in them should not be put through the composter. Depending where you live they can either be sent to commercial composters, thrown out or, better yet, incorporated into your art. 

  • If composting, collect the teabags from the compost before they have broken down. 
  • After steeping or removing from the composter, allow the teabags to air dry. 
  • Slit or cut close to one edge and remove the tea grounds. Tea grounds of course are compostable, or can be reused in other art projects or when eco-dyeing. 
  • Iron the now empty teabag between 2 layers of parchment.
  • Store in an airtight container until ready to use.


"Each cup of tea represents an imaginary voyage.” – Catherine Douzel
Do you include used teabags in your art? I'd love to see pictures of your work. 


IT TAKES A VILLAGE....

According to thefreedictionary.com, the meaning of "it takes a village"  is 

"Many people's help or involvement is needed to achieve some goal". 

While helping set up an Out of the Box Fibre Artists exhibit earlier this week titled "Guess the Idiom", I was reminded how each time a group of volunteers comes to set up a show, we just seem to just step into the various role without discussion, without assignment, offering our strengths, willing to try a new task, to get the job done and make the best display possible of the art that has been entered into the show.

It doesn't seem to matter if it's a group who has worked together before or if we have new volunteers. We just rally together towards a common goal.

We listen to each other, ask for input, see what each other thinks about a particular arrangement, if one piece looks best next to this one or that one, is one hung too high or too low, are some hung too close together, is the order of pictures conducive to showing each at its best. 

Each time we set up a display, we seem to add a new skill to our skill set. We get new ideas on where to place a tag, a new angle when taking photos, something to add to our toolbox. It just happens. We come together to find the best ways, sharing our knowledge and experience, each contributing our own unique vision, perspective, strengths. 

No one person did more - or less - work than any other. It was a team effort.

We enjoyed seeing the pictures in this exhibit "Guess the Idiom". It was a fun theme, leaving us feeling good, lots of smiles (even with masks on we could see the eyes smiling), appreciating the work and creativity we were witness to. 

As we undertook a final task of finding the best angle to photograph a piece  in a glass cabinet, an alternative perspective was suggested. In awe once again at how well we had pulled together as a team, I shared with the team that the idiom that had come to my mind about our synergy was "It Takes a Village"".😀 There was agreement all around. 

Here are a couple of pictures of some of our amazing volunteer team and a photo of one of the exhibit sections. The show is on through November 29th at the Stittsville Public Library in Ottawa.


DESIGN PRINCIPLES HELP GET YOUR COMPOSITION RIGHT

Who hasn't run into challenges at times when creating art. Too much detail, too busy, lacking a focal point, flat and lacking depth are just some of the roadblocks we may encounter. Others are colours that don't work well together, lack of cohesiveness, parts that don't connect. Can you relate to this?

At times I will backtrack and rip out stitching or paint over parts I feel I've bungled. We all have art that goes through an ugly stage before it becomes pleasing, re-working areas, not always sure if fixative steps will actually fix what wasn't working. 

It takes a lot of practice to improve and know what to alter and what will work, how to create harmony, rhythm that is pleasing, repetition without tedium. Understanding the fundamentals of design can help. 

At a recent online playdate hosted by the Out of the Box Fibre Artists, we learned all about using stripes to create a design. More specifically, the focus was on the power of rhythm & patterns of stripes. None of us had realized just how much there was to learn about the history of stripes or that there is a whole book dedicated to this very topic. 

Our first task was to choose our fabric colours - 2 or 3 side by side on the colour wheel, plus the complementary colours (or neutrals). I choose 2 yellows (a soft yellow and a bright yellow), a bluish grey and a deep blue. Okay, so yellow and blue are not complementary, but I liked how these colours worked together as I auditioned them. 

Next, we cut, laid out and sewed our stripes together in our chosen colours to create a 16x16 square. Then the fun part: creating patterns and movement with the stripes by cutting, rearranging, deconstructing or whatever our hearts desired. I chose to cut out areas to make circles, then sew curves diagonally around the circles to create movement, using the sew 'n slash technique of cutting between the sewn lines from one edge to another.  

Alas, it was clear that my piece was dull, even with the circles and movement. Not what I had envisioned.   

After trying on other colours to enliven the piece, I stumbled on some orange fun yarn in my stash - the perfect complementary colour to contrast with the strong blue and also next door to the yellow on that side of the colour wheel, just like the instructions had suggested.

I had to decide where to place the orange, but that was not intuitive to me. We were of course creating under pressure as it was part of a playdate and we were presenting our progress in just a short time. Creating on demand I find a challenge at times. So random placement was what I decided to do, just to get the colour in there. But it didn't help. It was still flat, only now with pops of colour unconnected to the overall design. 

After the playdate, when I'd lived with the piece for a few days, it occurred to me the orange would make a good outline for the blue circles. This juxtaposition of complementary colours was the answer. 

And the lightbulb continued to glow: balance was also lacking. I decided to trim parts of the yellows and grays to emphasize the dark blue, creating balance and more consistency in the widths of the stripes, and also to balance against the prominent blue of the circles. This resulted in a cleaner look, simpler and less cluttered.

Looking back at the changes I made, the design principles involved in this composition are:

  • Pattern
  • Movement 
  • Contrast 
  • Harmony 
  • Balance
Ta-da! Overall I'm pleased with how this turned out and decided to turn it into a cushion. It now has a place of honour in my little reading chair. 

One final observation: It dawned on me that several of us had challenges with the design side. This playdate was not about learning the design principles, but rather was about having fun playing with pattern - stripes specifically - as the basis for a design. We did not know in advance the steps we would be taking, nor the outcome, so there was no pre-planning, no opportunity to form a vision of what the finished piece would look like at the end of the day. 

Improv playdates such as this are wonderful for opening us up to new ideas, self reflection, and learning far more than we thought. Thanks to an insightful Out of the Box member for coming up with this idea so we could explore and experiment and see where this would take us. 

Link:

Related Post:


ASSEMBLAGE & FOUND OBJECT ART - PERFECT FOR REPURPOSING MATERIALS

Assemblage art is defined by the Tate Art Museum as "art that is made by assembling disparate elements – often everyday objects – scavenged by the artist or bought specially."

Found art, according to the Tate - "A found object is a natural or man-made object, or fragment of an object, that is found (or sometimes bought) by an artist and kept because of some intrinsic interest the artist sees in it."

There are all kinds of examples of these art forms dating back for many years. Pablo Picasso for example was a creator of assembly art. What I like about these art styles is the  scavenging for objects, often keeping them out of landfill when they no longer serve a purpose or have broken down, or repurposing them when coming across intriguing finds at a flea market or secondhand shop into something we can create.

As a fibre artist, I like to include non-textile items in my art pieces when it is appropriate to do so. After cleaning out my mother's old photo albums, for example, I repurposed the photos I didn't keep into painted backgrounds for stitching to make cards. Old cedar planks have become the backgrounds for other art. I've upcycled an old floor grate into a picture frame, and featured a backplate of a door knob in another artwork, surrounding it with more traditional fibre materials.

Old photograph with acrylic paint added, then stitched

The icicles picture at the far left includes cedar planks in the background. The picture on the stand is framed with an old floor grate, and has a doorknob backplate in the middle as it's anchor to build around.

October 19th is Textile Tuesday – one of 5 themed days of Waste Reduction Week in Canada.

Lots of information is available online about the amount of textile waste that goes into landfill, the carbon impact of creating fabrics, how often we keep and wear clothing pieces, the role of plastics in textiles, and so on. And while lots of clothing is donated to thrift shops, not all textiles can be re-sold, some making their way to becoming rags but much more going into landfill. Information on these and more is on the Waste Reduction Week website at Textiles Tuesday | Waste Reduction Week in Canada (wrwcanada.com).

As a fibre artist, I’m tickled pink when we share leftover fabric and other various goods and when I'm offered used items. Sometimes this includes materials we may not have  experimented with or incorporated into our art previously, leading to some wonderful play and new ideas. 

What can we do to reduce textile - and other - waste?

Swap – As the saying goes, one person’s trash is another person’s treasure. I was recently gifted 3 pairs of jeans that were torn and no longer worn by their owners, which I’ve since started cutting up for a couple of projects. There is something appealing about deconstructing old clothing to use for a new purpose.

A group in my neighbourhood has held 2 clothing swaps of men’s, women’s and children’s clothing as well as bags and accessories. All clothing must be clean and in good condition. Clothing is free for the taking, with leftovers donated to Dress For Success.

I’m sure we’ve all donated clothing to thrift shops or church bazaars. There are a few places that will take old towels or bedding – animal shelters for example – but check with them first before dropping off your items.

Mend or Refashion or Repurpose

I spent the first lockdown last year learning to mend – repairing several shirts that had small holes and a jean jacket with worn elbows and cuffs – some with stitching, others by adding patches for a more artistic flair. I’m delighted with how they turned out and how this simple repair has extended the life of these pieces. 

A favourite was repurposing an old burlap bag into a backing for hanging jewellery in a picture frame (see post on this project).

And, as mentioned above, I've used bits & pieces of non-fibre and non-textile materials in my fibre art. 

Play and Experiment

Old fabrics are wonderful to experiment with: eco-printing, painting, fabric collage, re-purposing into patches, making fabric twine, rusting with old tools, practicing free motion stitching. And figuring out what non-fibre objects could be added, or using fibre techniques with alternative materials. 

My experimenting today was a piece of assemblage art I started this week: colourful maple leaves, paints and natural inks, and using printmaking techniques to add a subtle background of leaves to a cedar plank. 

When was the last time you tried making art from repurposed materials and objects?


MAKING ART BY SEWING PAPER, AND BOOKBINDING MADE EASY

As fibre artists, we tend to work with fabrics, occasionally adding alternative materials to our creations. But the past couple of weeks I've been drawn to working with paper. Paper is fibre too, after all, and accepted in the fibre arts world. 

The papers I selected for my first project - all soft in colour - were each meaningful in their own way: old sheet music, pages torn from an old book, tissue paper I had embossed then gelli printed, gampi paper previously embellished but never used, a vintage looking paper bag, eco & rust printed white paper bag, and used tea bags (yes, I'm a tea drinker, not coffee) to which I added some alcohol ink. After tearing and laying out the papers until I had a pleasing arrangement, I tacked down the papers with a gluestick onto Kraft-Tex fabric paper which I had just recently discovered and purchased. 

Using my usual sew 'n slash technique, I machine stitched through all the layers of paper, using a "jeans" needle 100/16, cut between the sewn lines, then folded back some of the papers to reveal the layers below.

This was a great way to use up a bit of my paper stash, hoping to one day find a use for them. We can sew any papers - flyers, newsprint, magazine pages, paper bags, food bags, cardboard, anything that could end up in the paper recycling bin - and even if the papers have been previously painted.

I'm delighted with how this piece turned out - it has wonderful movement, a quiet area, soft serene colours, and strong contrast between the dark, square tea bags and the light, curvy background

My 2nd project was bookmaking, which I learned several years ago. I love the feel of handmade books, and  I think each has a purpose which will one day be revealed to its owner. They can be public or private, bearing silent witness to your thoughts, ideas, sketches, or what have you.  I've sold several soft cover, single signature books over the years, each with a uniquely decorated cover - and often used for sketching or journaling or when traveling, and can be tucked easily into a bag. 

But I had never mastered binding multiple signatures into one book. They always end up wobbly and floppy, and no amount of practice or viewing of videos has helped me overcome this challenge. Until now.

A recently purchased a copy of fibre artist Sandra Meech's book "Connecting Design to Stitch" (Sandra also has a background in graphic design and art) included instructions for making a bound sketch book. Her binding method is the simplest I've seen, and with a slight modification, I tried it. It was perfect. 

For the book cover, I used 2 small canvas art boards (4x6) which I had painted, collaged with leftover papers - torn tssue paper, sewing patterns, and other emphemera -  cheesecloth for texture, and more paint until I had lots of layers and was happy with the look. Yes, there were stages where I thought the boards were ugly, but the key was to just keep playing and layering. 

Each signature is individually handstitched. To bind the signatures together, Sandra outlined a simple weaving method. A photo is below - not great work for me just yet nor have I tidied up the thread ends -  but with a bit of practice I will have this mastered. I used gel medium to glue the first page and very last page of the bound book to the canvases.

I'm happy with this new-to-me technique and I know now there will be more hard-cover handmade books in my future. 


WHY LINE IS IMPORTANT IN ART

Lines, one of the design elements in art, are descriptive, the backbone of a design. They help to move the viewer's eye around a piece, can convey texture, be musical, or quiet, are harmonious or add vibration. They can be lazy, energic, elegant, rhythmic, and demonstrate emotion - picture an angry line versus a happy line. 

Lines can be hand sewn, continuous, dotted, smooth or ragged, machine sewn, couched, needlefelted, beaded, woven, painted....

Lines are everywhere, if only we take the time to look: the veins in leaves, the marks left by the ash borer beetle on an ash tree, the rings in tree wood, even the edges of stones or ripples in water. In reality the lines on stones and the water don't exist, it's the transition from one surface to another that we see, examples of outlines or contour lines that help form a shape. 

My sew and slash technique is all about lines - and contrast added using colour and texture. My best works are 4 to 6 layers of fabric. And sewn lines, lots and lots of sewn lines, with slashing between the lines through the top layers. After washing and agitating the fabrics, I am left with surprises about how the fabrics fray and fold and twist, showing off the multiple layers. The thread colour matters - sometimes I want it to blend in, other times I want the contrast. And I sometimes add more lines through beading or couching on yarns or bits of fabric. This piece below was based on the lines in a weathered and discoloured piece of corrugated cardboard. 


Horizontal lines in our art convey a serene point of view, although at times can be static. Vertical lines move the eye, while imparting strength and growth and stability. Diagonal lines add movement, as do meandering lines, spirals, and radial patterns.

The two examples below, both based on Van Gogh's Starry Night, demonstrate how lines can lead the eye. The first example is circles from metallic transfer foil, with stitching on and around the foil. Compare this to the second picture, also using transfer foil and stitching on the circles, but with the stitching leading from one circle to the next. Did you find your eye following that stitching to the next circle, then back again?

The first example was not planned, and when I realized the circles were disjointed and the picture static, on the next piece I changed the stitches to lead from one circle to the next. Much better, don't you think, to guide the eye?


Lines going in two or more directions add much more interesting than when they all go in one direction. This example has lots of horizontal and vertical lines, long and short, not perfectly straight but meandering just a bit. Even the short stitched lines add a needed embellishment to the background. Repetition of lines in this example was key to making the piece work. 

There are oodles of examples of lines in nature and manmade. The artistic eye begins to see, not just objects, but the lines all around us. Try making small (postcard size) examples of the lines you spot, and exploring how the addition of lines, whether stitched, couched, felted etc. can make a difference in moving the eye, defining a focal point, adding vibration and energy, or just a slow, meandering, meditative touch.

CREATING 3D IN FIBRE ART

One of my goals this past year was to create three-dimensional fibre pieces. I'm new at this dimensional work, having created mostly 2D wall art in the past. And it seems there are so many materials out there for the sculptural side of fibre to experiment with. I have only just started to tap into them. 

I completed a few pieces, but didn't feel particularly successful. But that is part of the learning process. We can't expect great results right from the get-go - what is important is to keep experimenting, to push our boundaries, and not let fear hold us back. We learn best after all through these attempts and, yes, through making mistakes  And I'm pleased that I was able to include a few three dimensional pieces in my recent show, Lineations. 


To make the vase shown above, after sewing fabrics together then slashing through the layers, I rolled and manipulated the piece until it took on an abstract shape I was pleased with. To give it more structure, I inserted a strong cardboard tube in the middle, and filled out the additional space with 2 pieces of pool noodle. 

Pool noodles are a great lightweight material, strong, and cut very easily with a box cutter. The tube and noodle gave the stability to the vase that I was seeking. However once I added the branches and baubles, that balance was in jeopardy due to the length of the branches (shorter ones just didn't look right) and the weight of the baubles. I realized using 3 cardboard tubes and a cardboard base would have provided much more stability than the 1 tube and 2 pool noodle pieces. But as I had already sewn the top & bottom together, I was reluctant to undo that and re-sew. It was good enough I decided for the show and the piece was not for sale anyway.

For this wasp nest (see my blog post on the making of this piece) I tried buckram as the base for the fabrics, then stuffed the nest with polyester fill. The use of buckram gave the nest more of a sense of fragile strength, just like a real, papery wasp nest has. 

As a lover of pottery bowls, I was drawn to try making fibre art bowls. For this one, I used a foam sheet, sandwiched between fabric layers, that can be shaped using the heat of  an iron or heat gun. Alas, I didn't get the depth in the bowl that I had visualized, perhaps because I had too many layers of fabric. Yet I am pleased with this shallow, wonky bowl which I then embellished with beads. I have since learned about fosshape (used in hat making) which may have been a better material - and one which I will be testing in future. Fosshape holds its shape, although there is some shrinkage when heated, and can be painted, stitched, glued, burned, layered, and even felted. 


For this set of 3 bowls, I added wire form, a lightweight cut-able wire mesh that is also sew-able. This was a home run in my opinion. It's important to cover the mesh completely with fabric as the cut edges are sharp. To make the shape, I cut a piece of mesh in a circle and added layers of sewn fabric cut in slightly larger circles to both sides of the mesh, then hand sewed the top to finish the edges and enclose the mesh. A glass in the centre worked well to fold the sides up and around. Some scrunching and shaping was the final step. These remind me of sea shells. 

Lastly, this Icicle piece almost didn't get done as I kept getting stuck, but I'm glad I pursued it as it has become my favourite. The lines of snow on the top half were formed with pool noodles underneath, and the icicles using combinations of lace, lacey fabric, and a translucent packing material, rolled and glued with a gel medium to hold the shape, then embellished with glitter glue. The icicles have lots of texture and look like assymetrical cones, just as a partially melted icicle is never perfectly formed in winter conditions. 


As I looked around the room at my show, and at all the wall art, I realized I had embellished many of the 2D wall art pieces with 3D elements, primarily using polyester fill. Most of my wall art is stapled onto a canvas. When I add 3D elements, I stitch them in place through the canvas between the bits of fill and sometimes through the fill it it's not too thick. 

In summary I did a lot more experimenting than I had realized over the past year. There are other materials out there that I still want to try, fosshape being one I have already mentioned. I think the key is to make samples before attempting that larger piece for which we have high expectations. Making samples is never a waste of time as we always seem to find a use for or alter them for a future project.

Related Posts:

Reflections on a Solo Exhibition

A Fibre Art Wasp Nest


POST-EVENT BLUES ARE A THING

We spend months planning, preparing, organizing for an art show, wedding or other large event, and are thrilled when the big day comes and see all our hard work come together. We rejoice during the event, taking stock of what worked well, kicking ourselves for what didn't.

And ever so quickly, it's all over. Just like that. Suddenly, just the final paperwork and some clean-up. And reliving the memories.

It's easy for the blues to set in afterwards, after spending so many months planning. You'd think the high would stay, but reality often sets in. It's a rather common phenomenon in fact to feel down afterwards.

You may start wondering what to work on next. In my case I didn't have another project or goal in mind to start preparing for, just a number of small tasks needing done that I had been neglecting. Many don't have a post-event plan as the show may have been a one-time thing. Or we may have simply been looking forward to some well-earned downtime. 

Some rest is needed before embarking on the next project. The fatigue we feel after an event may come as a surprise.  But as day to day normalness sets in, we begin to ponder our next purpose. I have things I should be doing to catch up, you know, some cleaning, weeding the garden, writing some blog posts, a few messes that sorely need re-organizing. But, honestly, I just didn't feel like doing these for a good 10 days or so after my art show opened. And even though I have an idea for a new smallish project, my get up and go seems to have - well - got up and gone. 

So, what can we do to prevent and/or improve these blues? 

  • Be prepared. We know these feelings will likely surface. The right mindset makes a big difference.
  • Recognize that these feelings will pass. We just need a bit of time, and rest. It can last days or weeks but knowing it will end is what's important.
  • Enjoy the memories. If it's the type of event you'll be running again, make notes on what you would change, what you would do differently next time. Savour the areas that worked particularly well. Organize your photographs of the event so you have a good reference for the future. 
  • Review the original goals for your event. Did you meet the goals or do you need to tweak some areas. What are some new goals you can set. See my post on 12 objectives for participating in art shows for some different perspectives.
  • Tap into your social network. Spend time with friends and family. Go out and do some fun activities. Catch up on what others are doing.
  • Spend time in nature. Nature is always healing and helps ground us. Go for long, slow walks, sit by a river or lake, plan a picnic with a significant other. If it's winter, walking, skiing, skating or snowshoeing are good activities.

  • Pay attention to clues and niggles that may become your next project. There's no need to act on anything right away, in fact the recharging time is necessary. Just be aware, note in a journal these types of observations, then after a few weeks see if the ideas have quietly slipped away or if you are starting to see a pattern. When we wait, we'll know if the idea feels right, rather than just rushing headlong into the first idea that comes along.
  • When you're ready, set new goals. Some people know right away what they want to work on. Competitive athletes for example fall into this category. Lots of people need more time though and, as mentioned above, we shouldn't just jump into the next thing without doing a review first.
  • If you continue to feel down, turn to someone for help. Talking it through with a trusted professional can help you work through this kind of difficult time. 

I have a couple of ideas brewing. They are not concrete yet but I'm taking this time to organize some of my messes, look at reference photos, do some research, and experiment with techniques. I'm chomping at the bit to start a new project, but need to remember to be patient so I don't embark on something that's not the right fit.  The recharging of my batteries is so important at this stage. I'll know when I'm ready. 

But first, it's time to review my annual theme or make a new vision board. This may just be the key to taking a step toward my next direction. And I haven't look at my theme since I started on this last project. It's time.

Anne

Related Posts:

12 Objectives when Participating in Art or Vendor shows

Annual Theme? Or Vision Board?


REFLECTIONS ON A SOLO EXHIBITION

When a friend applied for an exhibition at a city gallery several years back, well meaning friends told her it was unlikely she'd be accepted as a first-time applicant. So she didn't have many works ready other than those she needed to submit when applying. To her surprise, she was accepted for a solo show. She had just months to prepare.  Her advice to me was to 1) be prepared for anything and 2) have high quality photos for the application. 

Fortunately I had a bit longer to get ready when I was accepted late last year for my first solo, almost 7 months in fact. But no matter how much or little time is available to us, the work will expand to fit the time. And due to Covid-19, I was home more and so had more time to work on my fibre art creations. 
My show has only just opened and runs for a month. Here are some reflections on the experience so far: 
  • I'm pleased with the number of works I was able to make. Of course it is better to have a few high quality pieces that a lot of mediocre ones, and I think I've achieved a good balance. But some almost didn't make it...
  • The one piece I really wanted as high impact almost didn't get done. It took me out of my comfort zone and I had lots of uncertainty about next steps and completion. It would simply sit for days at a time while I pondered possible solutions. When I did work on it, progress was minimal. Despite experimenting with the "icicles" (photos below) months before to get the look I was seeking, it was the last piece to be finished and only one day before the show was hung. It was my stepdaughter who prompted me to finish it after seeing its potential. I realized I had been too close to it to be objective. And I'm pleased to say the piece has received many compliments.
      
  • Learning which items people like most is curious. Some liked my favourites. Others preferred ones I wasn't as fond of. Vibrant colours, high contrast or unusual materials seemed to be top of the list. Next was subject matter. It was heartening to see how many people did take the time to survey each piece of art and their many layers rather than giving any a quick once-over. (See my post on Learning to Look at Art).
  • I didn't hear any negative comments although I did wonder about the pieces no one mentioned.  On reflection, I suspect I included them as fillers or to look like I had a larger body of work. But each in its own way was important in its making: experimenting with a material, exploring a colour combination, or simply a piece that had been calling to me to be created.
  • But it was the ones that took me out of my comfort zone that have the highest impact in this show. The ones I struggled with. The ones I had to keep plugging away on and had fortunately started making early on so had more time to finish. One in particular that was vexing at times, in addition to the Icicles above, was a sunflower piece: see my post on Making Fibre Art Sunflowers Pop.
  • A few years ago I read a review about an art installation in which the art critic talked not just about the art but of the whole experience from the visitor's perspective. He talked of the welcome, the care taken by the organizers to make this not just a show but an experience. When we think about your personal purpose of having an art show, the critic is very right in calling attention to the deeply moving experience he had. An art show is not just about making and showing art and maybe selling a piece or two. It's much more than that. We share our creative side, our messages in the art, our innovations and enthusiasm, we connect with our viewers, we awaken memories, we inspire, we create a welcoming environment. 


A few words on the application and set-up processes:
  • Great photos are an absolute must! That meant learning how to take high quality photographs, getting the lighting right, adjusting the photos. All that takes practice. Some juries will look at the photos on a larger screen so they can see every little detail. Other shows want to jury the pieces in person. The goal here is to first get on the "maybe" list, then on the "yes" list. 
  • In order to have great photos, I needed to have high quality art. That means I needed to be accomplished with the techniques, but also have an eye for and good understanding of composition and design. 
  • My theme was important too, and not easy to write in just 50 words. The theme means a cohesive show of art. Until now I was never interested in working in a series, but that is what galleries want. And I realized that isn't as restrictive as I had originally thought. My primary technique remained the same with each piece, and my series built one upon the next within my theme as I continued to create and ask "what if" for the subjects within the theme.
  • Find out if someone from the gallery will be directing set-up, or if arrangement of art is up to you. There was a volunteer available if needed for my show, but it was left up to me to decide what to hang and place where. I had brought along a good friend who has much experience with hanging shows. Her advice was very welcome and sound, and this would not look as good without her input. 

A show of this type takes months to plan and prepare for, and it feels wonderful to see it all come together. And now that I have much more time on my hands I can get back to a few things I've been neglecting. And to decide what project to take on next.

Related Posts:


(Note: I have switched to follow.itFollow.it notifies you each time I have a new post. Check them out as they have a huge variety of articles that can be followed on all sorts of topics. Please sign up today to follow my blog.)

LEARNING TO LOOK AT ART

(Note: I've switched to a new "delivery service" called Follow.it as Feedburner is being discontinued in a few weeks. I'm not great at technology, so you may get this twice.)

I have a show coming up, my very first solo show. I'm excited yet at the same time a bit anxious. I want people to like my art, to enjoy it, to take the time to really look at it. After all, I've worked hard and put my heart & soul into this exhibition.

I've been to a lot of art shows over the years, and I'm realizing now just how many times I've walked through and not really looked at a lot of the art. I think we tend to only hone in to what grabs our attention, whether a bold colour, a style or subject we like, or maybe just something different that catches our eye. We are often quick to judge or bypass a piece after only a fleeting glance.

But when we do stop to look, there is a lot more to see than first meets the eye. 

I think we haven't been taught how to look at art. I know how I feel when visitors just walk past my booth with nary a glance. Perhaps they are afraid of feeling pressured to chat or buy, or are on their way to a specific artist's booth, or simply have no interest in my style of art. But mostly it's that they haven't taken the time to stop and look, to be immersed in it, to enjoy and appreciate what went into the creations we artists make and the stories we tell.

So here are my tips on looking at art:

  • Don't just walk past every single booth or wall. Stop and look. We can miss a lot if we only send a glance art's way. Sometimes it's a friend we are with who will stop - and suddenly through them we start to see what we had not seen before. 
  • Look beyond the landscape or colour that you first see. Just like when at a lake, we don't see those little fish close to shore until we stop and look into the water, we need to look into the art to see the layers, to see what what was not at first obvious to the eye. 
  • You'll start to see the layers that are more than paint or fabric, the materials used, embellishments buried in the art. I may add paper to mine, or bits of old photographs, maybe some words, packing materials, a stone or a piece of fallen bark. Even the stitches I choose are meant to reflect the effect I'm trying to convey. All these add depth that is definitely not apparent at first.
  • Look at the colours used. Are they harmonious or jarring? Did the artist choose a colour you didn't expect? Do you like the combination chosen?
  • When was the last time you looked up at clouds to find shapes? As with clouds, find the shapes and lines in the art, the soft & hard edges, flat versus textured or puffy areas.  Do these juxtapositions make some areas pop more than others? 
  • Sometimes an unusual perspective has been presented. Be aware if the piece evokes a memory, or brings up some emotion, or sings to you. Is there a story the artist was trying to tell? Look for clues here.
  • Underlying all these are the emotions the artist was feeling while creating. And the reactions of the viewers. Sharing thoughts on a piece with a friend can add a perspective we may not have thought of. Be open.
By learning to look, we begin to understand the elements and the journey of the artist while creating. We begin to appreciate the techniques used, the planning that goes into the composition and design, any messages and story the artist may be trying to tell.

We can then begin to experience the art and become immersed in what it has to say. Take your time, look, then look beyond. And help others to see art as you have now learned to see and experience it.


Making a fibre art Sunflower POP

After growing sunflowers last summer, I decided to make a fibre art picture of this majestic flower, and took many reference photos, large and detailed, of the petals and middle. This is my favourite and the composition I decided upon.


I made a start on this project several months later, and chose a variety of fabrics to layer and sew together for the petals, using different values of yellows and oranges and pinks to define each. I then slashed through the layers so the deeper colours would come through and would mimic the lines on the petals. 

The result was less than I had hoped for. 

So I couched on yarn to outline each petal but this did not help. Nor did adding yarn for the lines. Layers of tulle stitched onto the lower petals I hoped would push the uppermost ones to the forefront. But it was still blah. The only answer that seemed right was to put this aside and wait for a solution to present itself. This exceptional flower, after all, deserves a fibre art interpretation that is also stirring.

While I awaited an answer, I auditioned a few fabrics for the middle of the flower. I settled on burlap, which I cut into strips and wove together in a diagonal direction, and mounted onto painted brown paper bag. Yes, this was right. Well, almost. Something was missing.

Something to contrast with the yellows & oranges and the brown of the burlap - a bit of green to help the colours pop. A few green beads helped. A bit. But I knew I was on the right track. Being uncertain what to try next, I again put this to the side to wait for an answer to appear.

The solution came, of course, when it was least expected.  While contrast was needed, it wasn't enough on its own. I needed to to find what would make it sizzle, glow, sing, dance. To pop. To embrace its majestic side. 

This meant finding just the right fabric, and I dug through my stash until I found an old, damaged East Indian dress I had found at a thrift shop. The jewel tones were perfect, and with hints of green, it contrasted beautifully with the yellows and oranges. I cut out what I needed, playing with placement, and finally ironing the cut-outs in place with fusible webbing. In addition to contrast, this added much needed pattern and movement.

Now, back to the middle. 

Again, sorting through my stash, I found the answer. Old lace doilies. Their round designs complement the round middle of the sunflower, adding rhythm and movement, as well contrasting with the texture of the burlap.  

It still needs a bit of tweaking, then mounting onto canvas. But now it POPS, just the vision I was looking for. I call it Boho Sunflower.


Making Fibre Art for Health & Well-Being

"Everyone is going through this confinement differently. Frustrations were yelled out when throwing paint while others poured it on in complete calm and silence."
"Hearing paint slap against the board was so satisfying!"

"How freeing was that!?"

These were just a few of the comments and observations at a community art project organized June 8, 2020, by Orleans artist Maryse Fillion. She had set up a 4x8 piece of wood in her front yard, added words such as "Hopeful", "Kind" "Heartfelt" and invited members of the public throw leftover household paint onto the board (by appointment and while social distancing). The event was considered very successful.

Pandemic fatigue was a big thing on that date in 2020, and hair salons were only re-opening the following day after our first lockdown. The timing was perfect, an opportunity for participants to release some frustrations as nerves were still running high.

A second session was held at the Nectar Centre in New Edinburgh in July, and another in August by OOTB member Pat Hardie in her own neighbourhood and in consultation with Maryse, with varying results, in part because many people were a bit more settled having had more time to spend outside and in small groups. Yet there were still benefits - for those who splashed paint and the enjoyment of those just watching.

Making art - including playing with tools that make artistic marks - has definite therapeutic benefits. Even the viewing of art at a gallery or show is considered restorative, as evidenced by the growing number of "prescriptions" given by the medical community to participate in the arts. Also helpful are visiting museums, going to plays and concerts, and of course making art. And I can say that I was very heartened a few years ago, teaching art regularly to a group of seniors, that one lady said to me regularly after class "I forgot all about my aches and pains this morning", while others would comment that they were able to leave their problems outside the door while creating.

According to Dr. Cathy Malchiodi, a leading psychologist, counselor, art therapist, and author:

"Art's true function is to inspire us, mirror our thoughts, and embody our emotions. When words are not enough, we turn to image and symbol to speak for us." "Artistic creativity offers a source of inner wisdom that can provide guidance, sooth emotional pain, and revitalize your being. More important, it is a wellspring that enlivens, rejuvenates, restores, and transforms and it exists within everyone for health and well-being."

Stress and anxiety affect each of us in different ways. When the pandemic started, I took to mending clothes as it was an area I felt I had some control over. A friend switched from making art quilts to making practical items like knitted socks and hats. A local weaver wrote "sitting down to weave keeps those numbed feelings and thoughts moving freely and gently in a safe space."

So what types of textile art making are beneficial? Just about any technique that you enjoy. With each, consider how you are feeling, for example if you need something more physical to help you expend some of that anxious energy, then wet felting may be the right prescription. If it's quiet or a meditative state that you need, try stitching by hand, knitting or crocheting or weaving. The repetitiveness of this kind of work eases those persistent negative thoughts. And fun techniques like eco printing stimulate a sense of wonder, often at a time when we need it most. 

What are other ways the making of textile art can help?  

  • keep us grounded
  • cope with grief
  • honour our families and ancestors
  • help reach a calmer state
  • bring out positive feelings
  • lower blood pressure
  • remind us to enjoy and laugh
  • distract us from stresses
  • provide a sense of purpose or accomplishment

It's okay if we find it hard to create during these challenging times and are in a lull. Taking an online class, reading about and researching textile art, artists, techniques all boost our coping skills, while at the same time generating ideas to work on in future. The key here is to look for clues for a direction you can eventually take. Or maybe you're finding that other creative outlets are more stimulating right now, such as learning to bake bread, gardening to grow vegetables, decluttering. 

We all have good and bad days. What's important is to be compassionate to yourself, give yourself unconditional support, reach out to friends and family. And maybe pull out that old can of household paint and throw it on an old sheet. It really can be freeing. Think of the stitching possibilities to transform that painted sheet into some interesting fibre art. 

Published in the April 2021 newsletter of the Out of the Box Fibre Artists (https://www.out-of-the-box.org/)

RE-WORKING OUR WORK - FEBRUARY 2024

"Don't think. Thinking is the enemy of creativity. It's self-conscious, and anything self-conscious is lousy. You can't try...