SAVE PAPER THIS HOLIDAY SEASON: IDEAS TO MAKE YOUR OWN GIFT TAGS AND WRAP

I was shocked when I learned how much paper we go through each year for gift giving at Christmas. Some gets recycled, but much of the Christmas wrap has foil that can't be recycled. Think about how much paper your household may use this holiday season, multiply that by the number of homes on your street, add in your neighbourhood, the city, the entire country. Hard to fathom isn't it. The experts say we send the equivalent of 100,000 elephants to landfill each year in gift bags, paper and ribbons. 

This year I thought I would try to reduce the amount of gift wrap & tags we'll use in our household. We have several of those reusable gift bags. And after being given some pretty Christmas fabric, I sewed up a few gift bags which I've added to what we already had. Other wrapping ideas include decorated or painted kraft paper, newspaper, maps, tea towels, scarves, bags made from old clothes. 

My sister cuts up old Christmas cards into unique gift tags. This year I gathered up torn Christmassy tissue paper, colourful scrap papers, old book paper and sheet music, and turned these into collaged gift tags. 

If you'd like to make your own collaged gift tags, I've included the instructions below. 


 You will need:
  • a variety of pretty tissue papers and scrap papers in various colours. I chose mostly reds, but also some purples and blues and yellows to add interest. Tissue paper is great as it is transparent once adhered to the collage. 
  • heavy paper or cardstock, or art paper (paper that can handle water-based media is best)
  • gel medium (I use Liquitex matte medium) and brush
  • cutting board and knife, or a gift tag punch, or a package of pre-cut plain shipping tags, hole puch
  • iron
  • parchment paper
Instructions:
  1. Select a heavy background paper that can take a few layers of collage. Begin to lay out scraps of the papers and tissue, overlapping and placing them at random. Tear them, don't cut, to add interest. Don't spend a lot of thinking time on this as the papers will be cut out later into the gift tags.
  2. Adhere each paper down with gel medium, adding gel to the right side of the paper as well. 
  3. When dry, cut the pieces into gift tags in the size you wish, or with a tag-maker punch. I have this great punch I purchased years ago from Creative Memories which also punches a hole in the top to add ribbon or cording.
  4. At this stage I like to add a coat of gel medium on the surface to ensure all the papers are sealed. Let dry.
  5. For each collaged tag, cut out or punch one plain tag - this will get glued to the back of the collaged tag, providing an area for writing and adding strength, especially if you find your tags are curling.  
  6. Add a coat of gel medium on the back of the collaged tags. Let dry. Make a small pencil mark on one side of the plain tags, add a coat of gel medium to the marked side, and let dry.
  7. Carefully match up the back of a collaged tag with the marked side of a plain tag. Keeping the edges aligned, place between 2 sheets of parchment paper and iron on high heat for several seconds on both sides. The heat on the gel medium will fuse the 2 tags together into one solid tag, and eliminating any curling that may have occurred with lighter weight papers. Let the tag cool before handling.
Have fun with this - and I'd love to hear your ideas for reducing paper and making your own gift tags and wraps.


NERVOUS ABOUT PUBLIC SPEAKING? HERE'S A TIP

I was honoured recently to give an artist talk on the lichen fibre art piece I had made for the Creative Reactions show in May. The invitation was to speak at a staff lunch & learn session at the Collection Facility of the Museum of Nature in Gatineau and came from the botanist I had worked with as I created this artwork.


The invitation meant I'd be speaking to a group of 25-30 botanists, all experts in specialized fields and with so much more knowledge than me about lichens, even those who couldn't claim to be an authority on lichens. And that left me feeling somewhat intimidated at first.

Since I've had some experience with public speaking and with giving artist talks, I was confident I could deliver an interesting presentation to this group. It would take a bit of preparation however. 

We can look to structure and tips when writing a draft: ensure a strong start, give an outline of what you will talk about, provide evidence to support key ideas, pause after making important points, a wrap up to end, and so on. But none of these would establish my expertise as the artist.

The key - I realized and kept reminding myself - was that I am the expert about my process of creating this piece of fibre art. Me, not them. 

And that was what the group wanted to hear about - how I made each lichen and interpreted it through fibre, why I chose lichens for this piece of art, what I learned through this process, how the goals of art being a visual tool for science were met. I didn't have to be an expert on lichens - just had to have learned enough to reproduce them in a visual format. 

So if you're at all uncertain about giving a talk in public, remember that you are the expert. You, not them. And that the people in the room really are interested in what you have to say. 

That was certainly my experience with the group of botanists I spoke to. They asked lots of great questions, and later welcomed me with open arms to participate - with my art - at their annual Open House. And where I discovered I was able to actually answer quite a few general questions from the public about lichens. Who knew my expertise had grown so much!


SHOULD VISITORS BE ALLOWED TO TOUCH ART AT ART SHOWS?


Should visitors be allowed to touch art at art shows? I hear a resounding "NO" from many artists out there. The biggest fears seem to be that dirt and natural oils on our hands will transfer to our art or that a piece will get damaged or broken. We want to preserve our artworks after all.

But I also hear a few artists saying "yes" it may be okay to touch art - sometimes, and in a gentle manner.


I had my fibre art lichen at a show recently, not an art show, but as part of a museum's open house. Museums these days are implementing more and more interactive displays, recognizing the public wants more involvement than just looking. People want to touch objects, maybe even hold them, augmenting that participatory feeling.

Fibre art in particular seems to invite people to caress it, even if we don't want them to. It's tactile. It's all about texture. Wools and textiles convey a warmth that reaches out to us.  People want to stroke its softness, pet it like they would a cat or dog. They want to interact with art - whether sculpture, paintings, fibre, paper, pottery or another artform - and especially when a piece stirs up emotions. They build a connection through touch.

I had no doubt lots of people would touch my fibre art at the museum's open house. Especially children, as the sense of touch is very much part of their development. They just reach out and feel it, sometimes gently, sometimes more roughly. And while I didn't want to say no to them, as I understand this need, I did want to make sure they understood they had to be gentle.

Most of the parents asked permission first. Several stopped their children when they saw those little hands reaching. Other times the parents touched without asking, their children following suit. That I believe is inappropriate, parents should set an example by asking first. Granted, I didn't put out a sign saying "Do Not Touch" or "Ask Before you Touch" but perhaps it's because I'm aware the protocol is to ask and not just assume touching is acceptable.

Many people rely on their sense of touch to interpret an object - for them touch, not sight, provides information about the object's properties. Looking at something that appears smooth and shiny isn't enough, it's the fingers resting on or stroking the object that confirms what it feels like: hard, maybe slippery, cool or cold. We learn from a very young age the exploratory powers of touch.

A potter I know provided a textured bowl at shows that one could run their hands over, relieving parents of anxiety about their child - or themselves - touching and breaking, and satisfying a sense of curiosity. What a great solution. And of course for anyone who is visually impaired, well, touch is of course very important.

Maybe us fibre artists need to consider alternatives to satisfy those who wish to touch, to provide a sensory experience that goes beyond just sight. A "look but don't touch" expectation doesn't always work. After all, we fibre artists understand all too well the attraction to tactile objects to make our art, and yet we expect the public to keep their hands off the finished pieces. 

Yes, art shows are primarily visual, but perhaps having some raw materials on hand, or tools used to make the art, or a few pieces of art in a "hands-on" area would satisfy those itching to poke and prod. Then the "Please Do Not Touch" signs can be posted in the other areas. We'll never be able to eliminate touching completely no matter how hard we try.

And while we're on the subject, why not think more about how to reach all the senses, not just sight and touch, and create a truly multi-sensory art show.


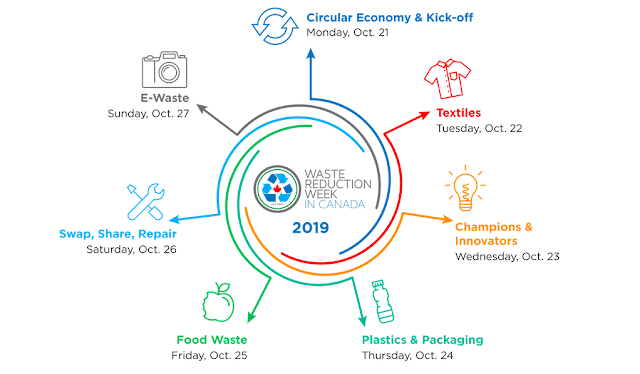
OCTOBER 21-27, 2019, WASTE REDUCTION WEEK IN CANADA

I recently wrote a blog post on repairing, recycling and altering worn out clothing and have since learned that Waste Reduction Week is October 21-27 in Canada. Glad to see that textiles is part of that upcoming week.

Each day has a different theme as pictured below, and a pile of information available on the Waste Reduction Week website: general news, the issues, solutions, and actions we can take for each daily topic.


The two I want to mention here are textiles (theme day is Tuesday, October 22) and plastics (Thursday, October 24).

More than 68 textile items are disposed of per person each year in the United States through recycling, donations, garbage and so on. That's a lot more than I realized and includes clothing, bedding, coats, shoes, and more. I was interested that some companies are taking the lead in converting discarded textiles into new fibres that can  then be made into new items. 

Here are a few additional suggestions from the Waste Reduction site that I had not included in my post, all great ideas:


  • hold a swap with friends, family and colleagues
  • search for DIY resources for altering and repurposing old textiles
  • be conscientious about what you buy in the first place
  • look to fashion companies that are recycling textile waste into new fibres


And on the topic of plastics, theme date Thursday, October 24, there must be more that we, as artists, can do to reduce or re-use plastics.

I know of some weavers, for example, who are reusing plastic bags in their tapestries, cutting up the bags into strips called "plarn". It adds a new dimension to their art. 

What other ways can we eliminate plastics in our artistic practices? I like to use old cereal bags as paint palettes and as a surface to glue on since paper and fabric don't stick to the cereal bag. And of course plastic containers can be  re-used as water tubs for brushes.

But these are only 2 ideas. What suggestions can you share? What messages can we send to manufacturers and suppliers of art materials to reduce the use of plastics?

Please share your thoughts and ideas on what we can do, not just during Waste Recycling Week, but all year long.


A TICKLE TRUNK OF TECHNIQUES

Remember Mr. Dressup and his Tickle Trunk from which he pulled an array of costumes for his skits? I may be dating myself but it was a show I grew up on, and I've always loved the concept of the Tickle Trunk.

I feel like I have a tickle trunk of my own now, only it contains a bundle of techniques I've learned for my art.

I've taken many workshops over the years in techniques and artistic concepts and am self taught in others, working with traditional and non-traditional materials, giving me not only many approaches I can draw upon but an eye to look on almost anything as a surface on which to create and to embellish. 

Sometimes I feel like I have too many techniques in the collection. It can get confusing after all to decide which to use and has left me feeling at times that I don't have a specific "style" for my fibre art.

But I'm learning that I do have an underlying style, the root of all my work. My artist friends tell me they recognize my work when they see it. The image I'm creating determines the techniques and materials to use as the base, then I draw upon additional modes for embellishment and details. Beading may be used for the frothy image of water on a painted background, painted tissue paper for a sky, embroidery for plants and flowers, painted brown paper bag and lace for a background. Thanks to my sister, who had broken her leg last year, I was able to use two of her fibreglass casts as a 'canvas'. 


While I have mastered my skills for some of the techniques I have learned, I am focusing on improving others, rather than adding more to the trunk. But my main objective is to practice building layers with and combining various techniques to add depth and drama to  my pictures, just like the Mr. Dressup's costumes are embellished with hats, shoes & other props, adding to their playfulness and building the character.

The list of techniques I've learned is long enough that I've actually had to write them all down. My "Tickle Trunk" inventory is posted on my studio wall, so I can refer to it anytime to audition the techniques for putting together a script for my art. 


ARTISTIC FRUSTRATION: VISUAL ART VS OTHER ART FORMS

It's an observation I've often made that was reinforced in the painting class I took last month at the Ottawa School of Art: that visual artists experience frustration if they have to backtrack and re-do parts of an art piece during its creation. 

Each artist in the class at some point didn't like what they had painted. We sometimes got stuck. We didn't always know how to move forward or how to fix what we had painted. We were irked when we liked something, took a step we thought was right, then realized we had wrecked what was good. Visual artists and fibre artists for the most part highly dislike having to "re-do" parts of a picture they thought were done. Oh yes we should be looking at these as learning opportunities, but it's still an exercise in frustration.

Our instructor reminded us throughout the week that painting is a process, it's about playing, adding layers, about the work evolving. She said anything can be fixed if we don't like it or it doesn't work. We just need to step back, re-assess, determine what colours, shapes, etc. are needed, then decide on the next step. Then the step after that. We are not perfect and we only improve with practice. If we change one section, it affects other sections. Keep going. Take a break when needed. Sit with it for a bit. Consider that we may not have had a strong enough vision when starting to create, or that the picture needed to reveal what it wants to be. Not to focus on the end result but to enjoy the process. Don't get discouraged. All great messages.

Yet still frustrating. 

I've seen many painters give up when something isn't working, the frustration of knitters when they realize they've made a wrong stitch and need to go back a row or sometimes more to fix the error, sewers when a piece doesn't fit or the machine is giving them trouble. A weaver friend felt she had ruined an entire piece of fabric she was making on her loom when she discovered an error in the pattern. She could not find a way to salvage it or make something else from the weaving and dreaded having to start over after spending all that time on it. It felt like a waste.

Perhaps we feel the frustration because we are left with something tangible on which we've spent time and money, and because that unfinished piece sits in front of us every day. We can save multiple versions of writing on a computer. We can 'undo' changes to a digital photo. We can move on from a piano practice when we can't see or hear it. But a painted canvas or knitted piece is harder to hide from view, we can't save an earlier version. 

And yet artists of other art forms seem to understand that changes and corrections and edits are part of the process. At least I think they do. Writers go through several edits before they are satisfied. They expect this and seem prepared to work through the changes. Yes, they know their first draft won't be perfect, that it will need a re-write, enhancing, then polishing. That first draft is more like a mind dump, then it can be reorganized, rewritten, polished, words changed up for others, polished some more.

Why can't visual artists think like that, whatever our medium? We may have a vision in mind, but often our vision will evolve. Usually into something better if we keep working at it, but it's hard to see that while we are in the process of creating.

Writing and painting and other art forms require learning of techniques, practice, allowing the creativity to flow, planning, and understanding the principles and elements that go into creation. But somewhere along the creative process, backtracking and re-doing and correcting seem like too much of a burden for us visual artists.

Yet, it's like tuning an instrument. We need to play with the colours, decide on the composition, understand the elements of good design. We may start boldly but as the piece evolves we can get drawn too deeply into details and begin to overthink the work.


There were times in the class I was taking that I didn't think my pieces were going to work out. Take the garden painting, for example. I started with a photo. I wanted to add my own vision by using more colours, interest, adding some mixed media pieces. Part way through I wasn't sure it would have a cohesive look. I'm very glad the instructor was there to give feedback on composition, colour selections, paint layers, tones and contrast, where it needed a pop of colour, etc. I got there, step by step. I haven't been painting much the last few years, focusing instead of fibre art. So practice is what I need, just like a dancer or a musician who will practice for hours before the recital.

It's not perfect, but it has much more colour than the photo, it's vivacious, fun and catches the eye. And that's what I wanted. Some sections have several layers of paint. It was easy to make corrections
Related posts:
Does Practice make Perfect?
Lessons Learned when our Art doesn't turn out
Getting Past the Hump in a Creative Practice

REPAIR, RECYCLE, ALTER - YOUR WORN OUT CLOTHING

Most of us are pretty good about donating clothing we no longer wear to thrift shops or rummage sales. But what about those items that cannot be re-sold, items that are damaged, torn or stained. After all thrift shops look for clothing to re-sell that is in good shape, clean, and odourless. 

Clothing that cannot be re-sold may be sent to places that repurpose them into rags or upholstery stuffing. Some will turn cotton into papers. Some gets sent overseas to be re-sold, and a small percentage does go into landfill. 

Before you get rid of your blemished, no longer perfect, in need of repair clothes, have you explored options to revamp, repair or make alterations? To extend the life of that favourite sweater or t-shirt? Here are some ideas to get the creative juices flowing:

  • If the hole isn't too big it can be darned. I know, I know, that was something our grandmothers or mothers did. But, really, the tidiest of repair jobs means the item is wearable once again. There are plenty of videos available online.  Of course it may take a bit of practice at first, but it's worth the effort to save a favourite piece of clothing. . And if the clothing has several colours or tones of one colour, the darning stitches just blend right in. Can you spot the repair in this picture? With practice, my repairs will improve even more. It's just below the arm hole so is barely noticeable. Of course, if you don't want to try this yourself, there are plenty of tailors available who will do the repair for a minimal cost. 


  • If after mending it shows up too much, adding some embroidery around the hole could do the trick.
  • Larger holes or stains can be covered with something another fabric, something that is complementary. Sashiko  or Boro - from Japan - and Kantha - from India - are all about patching up clothes and other textiles with scraps of cloth and with embroidery techniques specific to these regions. It also helps to strengthen fabrics, extending their lives even further. And no one says they patched parts have to match, they can be very colourful and funky, nothing like those old iron-on patches we used to see. This concept of repairing embraces the concept of "wabi sabi" which is about see the beauty in the imperfections and impermanence.
  • Old wool sweaters and blankets can be felted in your washer & dryer and cut into place mats or pot holders. Here are a few I've been working on. 

  • In days gone by, fabric scraps were recycled into beautiful quilts or cushion covers or other memory keepsakes - is there one hidden in your linen closet that has been passed down through the generations? I do sometimes see quilts made today from collections of old t-shirts or shirts which make wonderful keepsakes, especially when we have difficulty discarding a quantity of items that still have meaning.

    Or perhaps the scraps could be used to cover a mirror frame, like this one, or collaged onto a canvas, to make a piece of art.


  • Consider tie dyeing, bleach dyeing, sun printing, eco dyeing, fabric painting and more. This shirt was solid black, and after bleaching, turned this marvelous shade of brown. I used elastics to create the dark rings during the bleaching process.

Of course us fibre artists now look at old and damaged clothing in a whole new light, wondering if it can be altered or incorporated in some way into one of our projects. We collect fabrics for repurposing. If you also collect such materials, what suggestions do you have for altering or recycling?


SOMETIMES MAKING ART IS AS EASY AS FALLING OFF A LOG, OTHER TIMES GETTING BACK UP IS THE CHALLENGE

I purchased some old piano player paper a few months ago, seeing the potential to use some in in my fibre art. I didn't know just how I would use it, but the opportunity was there and the price was right. I was certain an idea would materialize at some point. I'm not sure how old the roll I bought is, although a copyright date of 1919 was given for the music itself, a waltz - Hand in Hand Again - and there were another 20 or 25 rolls available to buy.


Then in July when I was out with my outdoor sketch & painting group, I happened across a fallen birch tree with some marvelous patterns in the bark. I took photos, knowing I could make a picture in fibre art from this.

The piano player paper then came to mind, with its perforations that look similar to the horizontal line marks in birch bark.

I did a bit of experimenting to add colour to the paper, settling on bleeding tissue paper to add shades of reds and charcoals (it's a specially made tissue that bleeds its colour when wet). The white tissue didn't work as well, so instead I added torns bits of gampi paper, a very fibrous, whitish, translucent Japanese paper. I then mounted the piano player onto heavy brown paper bag to add some stability as the paper is fragile. Plus the brown of the paper bag can be seen through the perforations, just like the darker lines on the bark.

The next step was to add lots of stitching, following all the various marks in the bark. And then it was done. And I'm very happy with what seemed like an effortless piece of fibre art.


During the process a friend mentioned that it also had the makings of a map. She's right, and so I decided I would use the piano player paper once again but make a map this time.

😒 😣
The piece is coming along, but the effect of the holes in the paper has been lost. Perhaps I chose the wrong map, perhaps it's an aerial view, even if fictitious, that I need. I think where I went wrong was not to do more testing and experimenting, like I had done with the earlier one, along with my choice of paint rather than bleeding tissue. I was over confident this piece too would be as easy as falling off a log. I may finish it, but I think it's time to start, or experiment on, to make a new one.


LEARNING TO SEW - ON A SEWING MACHINE!

Although I learned to use a sewing machine when I was young and took sewing in grade 7, the results and the projects I made didn't exactly encourage me to keep trying. 

And although I've had a love of fabrics and a desire to create using fabric and textiles, I rarely used a sewing machine again until a few years ago. Oh, from time to time I'd decide to try and make something simple, but it was usually an exercise in frustration. I didn't take the time to measure properly, the tension always seemed to be off, a needle would break. I had (sort of) learned to sew, but I never learned how to use the sewing machine properly. And so I would put the sewing machine away again until I drummed up the courage to try again. I knew I should be able to do this, I have cousins who are beautiful sewers.  But instead of taking the time to learn the machine, I let a combination of mindset, lack of patience and lack of confidence deter me.

Then about 3 years ago I signed up for a 2-day workshop through my fibre arts group, one where we were learning techniques using a sewing machine. What's that saying?
"when the student is ready....". It was time for me to learn.

Before the workshop, I did familiarize myself with my sewing machine so I could quickly change threads, bobbin, even change a needle if needed. And I had the previous year tried sewing on cardboard and doing other fibre techniques on my machine. The results were okay, but enough that I was interested in learning more.

Through this workshop I learned the limitations of my basic sewing machine, but also discovered it was a workhorse. And, more importantly, I gained confidence in my sewing ability, and learned that it didn't matter if I could sew a straight line, it was the techniques, and the possibilities arising from these techniques, that caught my attention, from couching on ribbons to layering materials, to encasing sequins, all using this machine that had eluded me for years. 


Since then I've used this workhorse more and more, but its limitations prevented me from more experimentation. It was time to trade it in the old model for a new one. I wanted one that would do free motion embroidery, would be able to handle thick materials including cardboard, have an extra wide extension table and, most important, have an embroidery foot, walking foot, cording foot and other useful feet to expand my world even further. 

After researching brands and models, and reading many reviews, I found the one I was looking for. And I realized just how much knowledge I had already gained about tension, needle sizes, thread types and so on.

So now I am playing with the new sewing machine, experimenting, without the frustration I used to get. Well, most of the time - I still need to remember to lower the embroidery foot before I lower the needle so it doesn't jam. And it seems each day I learn something new, like using the walking foot for a piece that is 10 layers of fabric. I can change the presser feet quickly, filling the bobbin is a piece of cake.  I'm playing with the pre-programmed stitches, experimenting with materials, and have actually started to make some of the projects that have been on my list, and which would have taken so much longer had I had to hand-stitch. Now I love hand-stitching, find it calming and meditative, and so will not give that up, but some projects will be faster and I can combine the two.

The piece below is on a blue velvet-like material, onto which I added 3 colours of foil. I then stitched a layer of tulle over top of Angelina fibres, and couched on a blue metallic ribbon. 

This sample is a material slashing technique, made with 5 layers of fabrics stitched together then cut, or slashed, through varying layers. 

This last piece is a variety of fabrics - upholstery, drapery, organza, and old lace, stitched together with free motion straight stitches.


ART AS A LEARNING TOOL - AT THE CREATIVE REACTIONS SHOW

My experience as an artist at shows is that some people will stop and look at your work and others will keep walking until they see something that catches their eye. And some will back away if you happen to catch their eye or say hello, wanting to be left alone, not feel pressured to make a purchase. 

But at the Creative Reactions show where I displayed my lichens fibre art piece this past weekend, every visitor stopped to look at every piece of art and spent time speaking with the artists and researchers too. The closest I had come to experiencing this is at fibre art shows where each work includes not only a list of materials and techniques, but also the artist's inspiration. Viewers do seem to take their time looking at each picture when some context is provided. 

The visitors at Creative Reactions wanted to learn the stories behind the art. And each picture had a story to tell. Each artist had been paired with a research scientist to learn about their area of expertise, then create a piece of art based on the researcher's work. The idea was to combine visual art with science, to use the art to create awareness, for education, as a method of learning.

Art often has a hidden depth which a viewer may miss at first glance, and without tips such a materials list or inspiration. We first observe the design, colours, and possibly materials and techniques. The next layer includes messages for the viewers. At the Creative Reactions show the messages were the story the researcher hoped would be told through the art. These messages may or may not be readily apparent until one studies the art more closely and depending on the artist's interpretation of the messages into symbols. Underlying the appearance and messages in the art is yet another layer - the emotional side, a reflection of the researcher's passion for a topic, the presentation of concepts for further consideration by the viewer. These are sometimes subtle yet reflected through the many creative decisions made for each piece of art by the artist. 

It's this kind of attention to detail and love of creating that enriches an art piece. The one I created, titled "Learning about Lichens" includes 5 Canadian lichens, and because Paul, the botanist I was paired with, specializes in Arctic plants, 3 of the 5 are Arctic lichens, 1 of which is very rare and therefore meaningful to the botanists. The remaining 2 lichens were no less important, one selected for its name, the other because of a cross-Canada project the lichenologists had embarked on. 

The background for each lichen was just as important as the lichen themselves to illustrate their habitats, with materials and techniques chosen carefully. And the backdrop for the entire piece was a map of Canada on which the lichens were arranged so the names of 2 of the territories were highly visible. The last feature to be added was labels for each of the 5 lichens, styled after the labels the botanists  use to identify the botanical specimens at the Museum of Nature's Herbarium, and on which I included why the lichen was chosen, and the materials and techniques used to create it.


I realized quickly at this show just how much the viewers wanted to learn and talk about each piece of art and its story. I found there was an equal amount of interest in both the research topic and the materials and techniques I used in my work. And I'm glad I had a chance to see and learn about the other works on cancer therapies, robotics, probiotics and stress hormones, fibre optics, evolution and biodiversity, and ADHD.

Did any of the works sell? I don't think so, although some were for sale. But that wasn't the point or the goal for any of the artists. This was a different kind of show, a chance to expand our horizons, to learn about the research areas, and to see potential for future. 

The team I worked with from the Museum of Nature - Paul Sokoloff, Cassandra Robillard, Chris Deduke, and Troy McMullin - shared their knowledge with me, ideas and support, through a tour and several follow-up emails. I felt like one of the team.

And now that my awareness and knowledge of lichens has grown, I find myself keeping an eye out for them, and even found a lichen in my yard. I had seen it in the past but hadn't given it a second thought until now. I'll need to create that one next in fibre art.

Will I apply for this show again in future? You bet. In the meantime one of the botanists has challenged me to create a fibre art from a specific moss.  Can't wait to get started on this one.

Links to previous posts on my journey preparing for the Creative Reactions show:

Art Meets Science: A collaboration between artists and researchers

Lichens: Fascinating, beautiful and part of an upcoming art show

COMMUNITY ART PROJECT

Community arts projects provide opportunities to connect with others, create, learn and play. That was my goal from a project on the weekend...