AN ARTIST RETREAT REFILLS MY CREATIVE BUCKET

I have returned home inspired from a week in the wilderness with a group of like-minded, nature loving artists. Waterfalls, lichens, mushrooms, loons, rocks, hikes, swims, time spent creating and capturing the scenery on canvas or camera. A beautiful environment to explore ideas, experiment and create, in a very supportive environment. 

Lac Penniseault
It was a week of inspiring the senses: not just plants and landscapes, but also patterns and reflections; the sounds of loons and their babies, the roaring of the rapids, tent zippers, crackling campfire; the scents of clear air and pine trees; the feel of sand and rocks underfoot and of cooling off in the lake; the taste of local spring water, supper cooked over the fire.

Lac Penniseault - view from the camp

We were 15 artists, spending a total of 7 days together camping in the wilderness of Quebec, thanks to our sponsor, CPAWS (Canada Parks and Wilderness, Ottawa Valley Chapter), at their 5th artist residency, Dumoine River Art for Wilderness Retreat (DRAW). We camped in a beautiful setting with a large area for tents, a campfire pit, deck, eating areas, and a beach 66 stairsteps away (and of course 66 back up). A small barn and woods were ours to explore, finding many old rusted garden and cooking implements and scrap metal pieces, some of which we removed in an effort to clean up the area, but also inspired by the potential of these relics for our own artistic creations. Our disciplines included painters, photographers, a felter, fibre artist, a sculptor, even a sound artist.  

The highlight was visits to the Grand Chutes along the Dumoine River, with its roaring rapids, rocks, and towering trees. The trail along the river offered up a surprising number and variety of lichens, mosses and mushrooms. The feel of the area was magical, leaving us wondering if this was the world in which faeries live. The Dumoine is a protected wilderness area in the province of Quebec, and one which needs to be protected from further climate change and biodiversity loss. 

Dumoine River

Trail along the Dumoine River. Could faeries live here?

I have well over 350 photographs from this trip, including an excursion we took up a mountain where a new hiking trail is being forged, and of wildlife and an abandoned building nearby. We fortunately did not see any bears or wolves or moose.

Blueberry Mountain
I have lots of plans in my head for making fibre art pictures from this adventure, including 3 I started during the trip. I was also able to spend time experimenting with more sun printing on fabric, paper and birch bark, testing leaves I had not tried before with varying results. These too will somehow get incorporated into art. I was delighted when some of the artists asked to learn this technique - below is a shirt one artist decided to print on - a synthetic material that actually turned out quite well.
Sun Printing

Sun Printing on Birch Bark
My idea bucket is now very full. I am inspired. We had time to create, time together inspiring and sharing, also time alone to reflect, think, journal and work on our art. And each of us will be creating and donating a piece of art based on the area to help raise awareness of the importance of protecting our parks and wilderness areas.


MUST-HAVE FIBRE ART SUPPLIES WHEN OFF GRID

Once accepted into the artist residency starting this month, I had to figure out what art supplies I would bring. This planning is critical as there is limited space to store items at art camp, and no electricity. On days we hike in to a location, everything I need has to fit into a backpack - including my lunch, water bottles, and rain gear.

I typically work by layering fabrics, machine sewing them together then slashing, deconstructing, distressing. Not knowing what colours, types and textures, threads or embellishments I would need on this trip would normally mean hauling a large variety. I won't know what I want to focus on until I get there and explore. The choices are endless: tree bark, lichen, plants, river rapids, rock formations, wildlife, ruins, even the rusted metal equipment in a local abandoned farm. My sewing machine will obviously not be coming with me, an integral part of my process, so hand stitching the layers of fabric together is the plan, a time-consuming step in the creation of fibre art.

Hence I decided making small samples on the trip would make the most sense, supplemented by sketches and photos. Larger pieces can then be made once I'm back home and based on my reference material. This means I also need to pack a sketchbook, watercolour and graphite pencils and erasers. I can add details in writing beside my sketches to record my impressions and feelings, and capture senses such as smells, touch, sound and of course, sight. All this will help me choose the right textures and colours later on as I interpret my impressions into my art.


I have now made a few samples in advance of the trip to ensure I have the right supplies and know what techniques will work with minimum fuss. 6"x6" seemed like a good size. I tested both running stitch and basting - this latter one is definitely faster, and I can supplement it with a bit of fabric glue between layers along the stitch lines for added strength. The 3 samples below are based on these methods and from photos I took recently of tree bark and wood, the first with Tyvek to represent lichen, the 2nd to capture the yellow of the wood,  and the 3rd with some fallen birch bark included - very easy to stitch through as I discovered.


I have now cut up a variety of fabric colours and weights that I'll be able to choose from, all 6x6, taking up only minimal space in my backpack. Threads, scissors, needles, embellishments all fit into a small toolbox.  Even some Tyvek, already painted, layered with organza and heat distressed, as I won't be able to use my heat gun or iron at the camp. 

I also plan to experiment more with more sun printing, foraging for local leaves and flowers. This means additional paper and fabric, plus paints and brushes. Taking rubbings of textures on rocks and trees is another item. And perhaps finding some natural mark making tools to play with. 

The list of supplies is growing. But I figure sun printing will be done at camp only and not on day trips so I won't have to haul my paints or larger papers on those days. 

Fortunately there will be generator on site, so I can charge both my camera and phone at night so I can take lots of reference photos each day. (There is no cell service at our camp).

Lastly, I also plan to journal about my experiences and impressions each day, what I am learning, experiments, what the other artists are working on, and whatever else comes up. I suspect there will be several good stories to share. 

Check back in a couple of weeks when I have returned from this artistic adventure. 


HAVE YOU TRIED YUPO PAPER?

Yupo paper is a synthetic made from polypropylene - it's waterproof, very smooth, tree-free and well known for its use with alcohol inks and watercolours and dry media too, recyclable, and considered an environmentally friendly substrate. It comes in white and translucent. It's often used in product packaging, as banners, menus, signs, waterproof maps and more. 

Although I had briefly tried Yupo paper a few years back, it's only now that I'm really beginning to experiment with it.

Alcohol inks are the most popular mediums used on Yupo - google "Yupo paper", and alcohol inks will come up multiple times. Markers work great too, as do watercolours. The inks and paints flow around on the paper, it's important to let the paints do what they want and not try to control them too much. A fixative should be used with paint to protect your final "painting"

But what about uses in fibre art? Here is what I have tried so far:
  • Sewing - very easy by hand and with my sewing machine
  • Sun printing - in this experiment I used Pebeo setacolour inks (see post here for more info on sun printing)

  • Metallic transfer foil - using glue and an iron - the heat causes the Yupo paper to ripple, an effect that could be favorable depending on the outcome you are seeking

  • I also tried sewing Tyvek fabric to the Yupo, then used a craft heat gun to distress the Tyvek. The heat created wonderful wrinkles as well as melting in some areas (be sure to do this outside so you are not breathing in any fumes from the Yupo). 

  • A soldering iron was next - I found some interesting pictures on Pinterest of Yupo painted with alcohol inks and using a soldering iron to make holes of varying sizes.  The picture below was just a quick experiment to make a few small holes and determine how much control I would have over the sizes of the holes (as above, be sure to use the soldering iron outside or a mask to protect yourself from any fumes).


  • Yupo paper can be easily folded - its strength provides potential for book arts, or maybe even pop-up cards. This could be fun to play with.
I also found an example of a basket made with Yupo, in an interview between the World of Threads Festival in Toronto and a basket maker. Scroll about halfway down to see her diagonal twill basket called "Onyx", created using only Yupo paper, acrylic paint, and waxed linen thread. (All her other baskets were made using watercolour paper.) I like that she commented in the interview that she consistently asks herself "If I do X, what will be the result?"

We are just beginning to tap into the potential of this paper, I think, as fibre artists. I purchased a pad of the translucent, rather than white, and plan to begin using some in my art in the coming weeks. Results to follow.

SUN PRINTING HOW-TO INSTRUCTIONS

When I decided to try sun printing in preparation for my upcoming artist residency, I found many sites with only brief instructions, and only a couple with more detailed information on possible surfaces and paints. Thus began my experimenting, as I wrote about in last week's blog post

So, for those who wish more than just the basics, here is the step-by-step process, and some of the tips & tricks I learned along the way.

Supplies

  • Materials to print on:
    • A light coloured cotton fabric works very well. I tried other surfaces such as old sheets, linen, felt, cotton rag paper, watercolour paper, rice paper, brown paper bags, mineral paper (the blue print shown here at the right was done on mineral paper), and other papers I had on hand. Experiment with whatever materials you have available as each gives a different effect.
  • Acrylic or fabric paints
    • Liquitex soft body acrylics and Pebeo Setacolour light paints (transparent paints) were highly recommended for this technique. Other paints may work, but I have not tried them. 
  • Sponge brushes or paint brushes
  • 3 water containers (margarine tub size is fine)
    • 1 to rinse brushes
    • a 2nd for clean water to add to your paint
    • a 3rd for wetting fabrics  
  • Flat surface for your paper or fabric, and on which to leave your sun prints to dry (not wood - as the wood will absorb some of the water from your fabric or paper)
  • Materials for the printing - leaves, stencils, heavy objects - these need to adhere well to your fabric or paper
Directions
  • Prepare your paint: it needs to be diluted with water at about a 1:1 ratio so it flows well. I mix just a little bit of paint at a time as it goes a long way. Paper cups or a watercolour paint tray works well. 
  • Wet your fabric in a bowl of water and squeeze out excess. Lay flat on your surface and try to eliminate air pockets. If using paper, brush on water in both directions, ensuring it is well saturated. Papers such as brown paper bag absorb a lot of water, so it's best to dip it into the bowl of water, scrunch, squeeze out excess water, then lay out. If it's not wet enough, the paper will  dry too quickly. The scrunching effect can leave some lovely lines on your surface.
Brown Paper Bag - wet and scrunched prior to adding paint.
This gave a slightly mottled background with faint lines, an effect I quite like. 


Other surfaces, such as this Tyvek envelope do not absorb water - the thinned paint will sit on top. A little paint will go a long way.

  • Try using a mordant (optional) - I dipped some of my fabrics in a rust mordant after wetting. Does it make a difference? I have not yet tested that, but it may alter the final colour slightly. I also tried dipping leaves in the mordant. 
  • Paint your surface with 1 or 2 colours - I like to pour on just a bit of paint then spread it out. A little can go a long way. You'll find different paint colours will give you different results, so experiment with various colours, and mixing colours.
Try unusual materials like birch bark - soak first for about 30 minutes.
In this example I used Liquitex soft body acrylic paint. 

  • Press the leaves or stencil onto your surface, making sure the edges have good adherence. The better the contact, the sharper the lines will be. You could also try objects like old washers or bolts.
  • Place in the sun and let dry for 1-2 hours. I had to mist a few pieces, but they likely were not wet enough to start. The printing also seems to work on cloudy days so I'm not actually sure how important it is to be directly in the sun.
  • Once dry, remove the leaves or stencils and other objects.
  • Record your results - otherwise you may not remember what paint or objects worked on what type of material.
  • Heat setting is next - fabric can be put in the dry on high for 1 hour - or can be ironed on the back side between layers of parchment). Paper can be ironed too, between layers of parchment. Hand washing of fabric may be needed if there is excess paint and if it's for an item that will be worn or for pillow cases or placements. I have yet to iron any of my pieces, rather I have let them sit for a week first. And since I used Tyvek for a couple of my experiments, I won't be heat setting it, since it reacts to heat.  
    This red and yellow one was on Tyvek fabric using Liquitex soft body acrylics and fern-like leaves - it turned out absolutely fabulous. We typically use some kind of heat (and often stitching) on Tyvek, which will significantly change the look. Not sure I'm ready to try that just yet. I'll wait to decide what to do with this sample.


The fun with this technique is the experimenting - and taking risks with various materials. 
Next I need to figure out what I'm going to do with all my samples. I will be doing more testing at my upcoming artist residency later this month....

Related Post:


SUN PRINTS - AND AN UPCOMING ARTIST RESIDENCY

Delighted to announce I will be taking part in a week-long artist residency at the end of July through the Dumoine River Art for Wilderness Retreat, sponsored by the Canadian Parks and Wilderness Ottawa Valley Chapter. The retreat includes 15 or so artists using a variety of mediums from felting to photography to painting to storytelling. We will be creating art en plein air, inspired by the rugged beauty of the area.

The goals of the retreat are to:

  • learn more about conservation, to be inspired by the richness of the area
  • create art that supports CPAWS-OV's conservation work, and
  • raise awareness of the important of parks and protected areas in halting and reversing climate change and biodiversity loss. 

My personal goals at this residency are to:

  • create small fibre art pieces to document parts of the landscape: the lines in nature, decay, tree bark, lichen, rocks, and more 
    • I also plan to do some sketching and take oodles of reference photos to continue this goal later on, plus record my impressions about the land, colours, textures and other thoughts, and 
  • experiment with sun printing on fabric and paper. We won't have electricity at this retreat, so steaming my fabric to eco print won't be an option. Instead I'll use the power of the sun. 

In preparation for sun printing at the retreat, I googled this topic looking for information such as which paints and materials work best, since I can bring only a limited amount of supplies. I found only a handful of blogs where the writers have experimented beyond the basics. Cotton fabric was highly recommended, and 2 types of paints: Pebeo setacolor for light fabrics (a transparent paint) and Liquitex soft body acrylics. Some also recommended using mordants such as alum or rust. 

Here is what I have tried so far as I began experimenting prior to the retreat start:

  • White cotton and cotton rag paper: I treated both with alum in advance, then painted  with Setacolor paints. The fern leaves have good contact with the paper and fabric, helping to ensure sharper edges in the final print. I left these to dry for about 2 hours. 


Below is the result on the cotton fabric - this was on an old, embroidered cloth:


This was the result on cotton rag paper, much more subtle, yet I do quite like the effect:


  • Next I tried a scrap from an old yellow cotton sheet, putting it into a rust mordant first, then painting it with the Liquitex soft body acrylics. I  am very very pleased with the result:

  • Old linen, treated first in a rust mordant, turned out beautifully using red and orange Liquitex paints:


  • Rice paper, painted with the Liquitex soft body paints. I had no idea how this would turn out. It's subtle, yet soft looking, and I think has wonderful potential as a background or perhaps with some stitching added: 


  • Yupo paper was next on my list to try, and is my favourite so far. Yupo is a synthetic paper, very smooth, and often painted with alcohol inks. For this experiment, I tried Setacolor paint, with surprisingly pleasing results. I love that the veins of the leaf show up, and that the print left a solid line around the leaves. I will definitely experiment with more on this paper and already have a project idea in mind:


  • These next two are on watercolour paper using Setacolor paints, also with interesting effects. I'll be trying this again to see if I get similar results:


So, what's next? 

I've had fun with these experiments - and will try different leaf and plant types to see which will provide good contact with the materials. I also plan to try bleeding tissue paper and printing  on materials such as mineral paper (made from rocks), Tyvek, brown paper bag, old newspaper, and more. I will let you know how they turn out in the next couple of weeks, as I narrow down my supply list for the retreat. I may even try some solar dyeing in mason jars. 
Out of interest, I found a reference to an article in Quilting Arts Magazine, summer 2006, about sun prints on tissue paper. And I just happen to have that issue in my magazine stash.
Stay tuned!

FINDING INSPIRATION FOR ART

It's been wonderful being able to visit art shows again in person, to actually see the art and not just on a computer screen, to talk to the artists. I like to take photos of art too (with permission of course), especially when I'm inspired by a piece, or when there is a colour combination or perhaps a technique that could be a potential solution to a struggle or two with art that I'm currently making. 

A couple of these shows took me to small towns not far from home. We like to take long walks around places we visit, poking in shops in downtown areas, visiting waterfronts, finding interesting details on buildings and even alleys that invite one to explore. I find so much inspiration and can't help but take more photos, all becoming great references for future. Here are a few from a recent trip that will more than likely be turned into some kind of art:

The striking colour of the orange lichen against
the dark colour, rust, 
and discoloration on a steel bridge:


An old, abandoned factory - there is a kind of beauty in this decay, and I'm already planning a piece from these photos:


I just had to get these 2 photos - a quote painted on a wall on the main street, and a mural made entirely of handpainted small squares, each with a different picture, then assembled into the the larger mural. How inspiring - and creative - are these:


I'm also finding much inspiration during nature hikes. I had joined a snowshoeing and hiking group this past winter, discovering trails in my area that I had not visited before and some I had but had not thoroughly explored. And while I joined primarily for the exercise, I'm thoroughly enjoying the social side and being inspired by the beauty around us during these nature treks, I take photos when I can during these hikes, and have even revisited a couple of places to take more as these photos are providing wonderful inspiration for new art pieces. 

Where do you find your inspiration for new art, or for other creative ventures?


FINDING NATURE'S ARTISTRY - AND WEIRDNESS

I'd never heard of a derecho thunderstorm until last week when one hit this part of the country. 110+ km/hour winds gave way to hundreds of toppled and broken trees in my area. So many old and beautiful trees lost, including 8 on our property. We were among the lucky ones who had very little damage to our house and were without power for only 4 days. We did have to bring in a team to finish taking down broken trees, and spent hours cutting up and clearing branches around our house and the neighboring homes.

While taking photos to document the damage and destruction, I started to notice some of the artistry - and weirdness - of nature in the piles of wood and branches. I decided to try to capture some of this artistry as part of this record, perhaps to interpret into fibre art in future as a further reminder of the destruction - and the beauty revealed - from such a powerful storm.

Pile of wood awaiting removal


Lichen covered branch - can you spot the three different types?


Do you see a knot - or an eye?


I took this photo because of the lines in this broken tree stump -
and didn't notice until afterwards the photobombing bee!


I'm pretty sure this is Slime Mold - one of the weirdos of the forest. Although I had heard of it, I don't think I had ever seen it - until now. Like a blob, wet looking, a wee bit gross in fact, yet fascinating all the same. Not sure it will be part of any future art piece though. 


It definitely pays to keep one's eyes open - the more you look, the more you see, and learn.
Respect for nature, respect for storms, and a definite high respect for all the hydro workers, workers clearing trees and branches, volunteers, neighbours helping neighbours during these difficult days. 

CONVERSATIONS - AN UPCOMING GROUP SHOW

Fibre 15, a local fibre arts group I am part of, is preparing for an upcoming gallery show - we've called it Conversations, and described as:


What is a conversation?
Employing a diversity of fibre media, Fibre15 members explore this theme, challenging assumptions about how and what we exchange.


There are 10 of us in this group show being held June 4-26, 2022, with the vernissage on Friday, June 3rd from 6-8 pm, at the Stone School Gallery run by Art Pontiac, at 28 Rue Mill, Portage-du-Fort, Quebec. The gallery is open Thursdays through Sundays from 11 am to 4 pm.

The support from the gallery has been superb as we get ready for this show. Even though I have an events management background, I'm always surprised just how much work and detail shows such as this can take: 

  • agreeing on the theme
  • preparing the proposal and photographs for our application 
  • taking photos of works for the poster (poster was made by the gallery)
  • deciding who brings what food for the vernissage
  • organizing who will work at the gallery which day
  • writing and collecting artist statements and bios
  • preparing price tags and labels for all the art
  • promotion - through social media, video, etc. - and collecting photos and words for this purpose
  • preparation for set-up, and take-down - and who will collect and deliver the works to the gallery - and the set-up day

Of course, someone really needs to be the lead on this whole effort, to ensure no tasks are overlooked, communicating with the gallery, getting answers to questions.

All this while we still had to find time to make our art. That, after all, is what the show is about - our art and the theme.

I have six works ready (4 are pictured below), but am not yet sure which of the six will actually be in the show. A curating team has been assembled who will make the final decisions around space, cohesiveness etc. 


And three of us also applied to teach during this show - I will be teaching collage & embroidery on paper. Here is the same piece - there is more information on the Art Pontiac website at https://artpontiac.com/en/category/course-2022/

Hope to see you at the show!


12 OBJECTIVES WHEN PARTICIPATING IN ART OR VENDOR SHOWS


I first published in this post in September 2018, then again in March 2019. After two years of Covid-19 and with some shows opening up again, this seems like a good time to re-post. While many shows have gone virtual and some are still virtual, most of the objectives listed below still apply. 


Let's talk about goals & objectives for participating in vendor, craft & art shows. Of course making sales is usually the goal in such shows. We have, after all, spent time planning, gathering supplies, making our products, and we've likely paid a fee to be in the event. We want to move some of our products and make some money from it.

But what if you don't reach your sales goal? And worse, what if you don't make any sales or even sell enough to cover your booth fee? It's happened to all of us at one time or another. Frustrating isn't it! And it's easy to become a grumpy cat during the show, but then potential customers don't want to approach us. And sadly we can start to appear desperate.


But, wait! There are many other benefits to participating in a show. A simple shift can make all the difference in your perception of success, even when your sales goal is not reached. And that shift is to be open to the many other positive gains we can make, positives that can help us down the road. And that shift is to look at the event, not just to make sales, but as an advertising opportunity. So bear this and the 12 ideas below in mind when you're at a show, perhaps even set some additional objectives when working at shows. Great sales or not, these are areas we should be looking at anyway to help us in future. 


        Connect with your visitors

  1. Get your name out there - talk to visitors, make an impact so they will remember you. Connect with them. Shows are, after all, an opportunity to advertise and not just sell. They may not have met you or seen your work before. Or perhaps they are just not yet ready to buy and need more time. And once a potential customer has seen your work, they may look for you at other shows or at the same show next year. 
  2. Grow your client base. Do you send out a newsletter, have a blog, Facebook or Instagram account? Capture names and emails to bring people to your social media accounts (always respecting spam laws of course).
  3. Find out what people think about your work and products. This is a perfect opportunity to get feedback. Show visitors who are attracted to your work will tell you what they like about it, what they look for. You can get a feel if people are looking for functional items, are re-decorating, want inspiration and information, are interested in taking workshops, or are at the show for other reasons. Which item draws them in the most, which one is no one looking at? 
  4. Practice your elevator pitch. Hopefully you will have practiced in advance what to say, and the more you can practice, the easier your words will flow. But don't automatically assume someone wants to hear all about your product if they approach your booth. You need to know what to ask to determine what they may be interested in.
  5. Sign people up for workshops - if you teach, a show is a great opportunity to show what you will be teaching, and get people to sign up to learn the techniques you use.
  6. Try demos. Artists often sit and sketch or paint during quiet times. If you sell kitchenware, demo how to use them. Visitors love to watch and it can help draw them in. Check first that show rules allow demos, as some do not. 

    Network with other sellers
  7. Visit the other artists and vendors, see and talk to them about their work. I often find new ideas  - a different way to display something for example - or am simply inspired and motivated by the artist and their work.
  8. Get leads on other shows and opportunities. Lots of networking can happen at shows, and I've been able to not only book other shows but offer spots to others in shows that I have run. 
  9. Get to know the show organizers to see what else they are involved in.

    Test a booth layout
  10. Test a booth layout or new look or colour. Sometimes it takes a bit of trial and error before we happen upon the ideal set-up to show off our work. And a spot in the middle of the room has to be arranged differently than a corner booth. See what others do that may work for you. Sometimes it's just a little pedestal or some height that can make the difference. And testing outdoor booths is important too, in case of rain or wind.
  11. Take photos of your booth - you'll notice things in the photos that you didn't see in real life, both displays that look great and areas that need to be tweaked. Pictures close-up and farther away can be very telling and can go a long way to helping your booth look polished and professional. 

    Be Inspired
  12. Above all, enjoy. If sales are low, don't be the picture of doom. Visitors can feel your negativity, and may be reluctant to approach you. So no matter how things are going, smile, enjoy and be welcoming. And remember the other ideas above. Who knows what the future holds.
And speaking of virtual, Out of the Box Fibre Artists, of which I am a member, is holding a virtual show & sale April 23, 2022 until May 8th, 2022. Do please check it out! https://fiber-fling.ca/


ALL IN THE FAMILY? COULD OUR INTERESTS BE GENETIC?

Growing up, I wanted to be an architect or interior designer. I signed up for architectural drafting classes in high school, and while I enjoyed the detailed layouts, I didn't love the precision required. But I was fascinated with all types of houses, especially older ones, the floorplans and the architectural ornamentation.

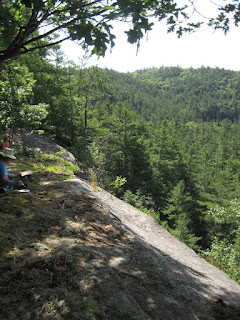
Trips to Europe and Asia introduced me to even more styles of buildings, from the narrow homes on Amsterdam's canals, to the temples of India and Thailand, to the renaissance elements of buildings in Belgrade, Serbia. My hundreds of photos have given me lots of references for future art pieces. 

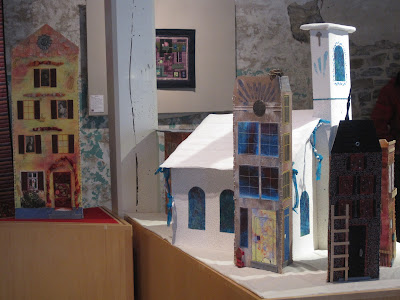
And while I didn't end up in a career related to architecture, I did land in one requiring very detailed work. My interest in buildings has continued, however, through my art, first painting, then in coloured pencil, then in 2016 designing a three dimensional village from repurposed items: cardboard, fabrics, used teabags, ceiling tile, an old table cloth, bobby pins and more. This village, titled Urban Refurbishment was part of the Colour Unboxed show of the Out of the Box Fibre Artists that same year at the Mississippi Valley Textile Museum.

While taking a psychodrama class in an expressive arts facilitation program, our prof suggested I further explore my fascination with houses. My thought at the time was that she was suggesting I explore the idea of "home", not "house", but I knew that was not the issue. 

I was curious, however, about where this interest came from. Both my parents were creative, as are many of my relatives: we have several writers in the family - journalists, an author, even a poet - all on my father's side. And knitters, sewers, tatters, painters and other creative talents on my mother's side. All this leads me to believe our interests can be genetic (we do have a geneticist in the family although I have not reached out to him with this question). Certainly my creative side comes naturally to me. But I was unaware of anyone else with the same enthusiasm for architecture or old buildings. Until now. 

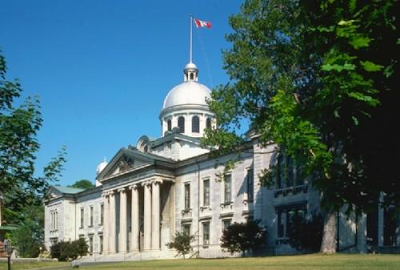
Fast forward to the present, and I may have the answer. My sister sent a link to an obituary about our great-great-grandmother. Said article also included information on her many brothers and sisters: it seems my great-great-great uncle on my father's side was an architect, and my great-great grandfather, also on my father's side, was both an architect and builder. From there we learned about a few of the buildings each had worked on, and just a two-hour drive away from where I live today.

Frontenac County Court House National Historic Site of Canada - My Great-Great-Grandfather is listed as one of the builders


Are our interests genetic? We know certain traits or health issues can be inherited. But interests? There are those who feel we carry the stories of our ancestors, that their experiences are woven into the fabric of our lives. Perhaps I am feeling some of their stories, and now I will also be able to visit the buildings they worked on.

Whatever the answer, what matters is this has given me a connection to my ancestral past, and I plan to continue pursuing this interest and see where it leads. Do you or someone else in your family have an interest that may have been passed down? Perhaps one that no one else seems to share? Ancestral memory may just be at play... 

Related:

Linking to our Past - through Photos


WHAT DOES BEING CREATIVE MEAN TO YOU?

Many people tell me they don't have a creative bone in their body.  That they can't draw a straight line. Which leads me to the ques...